How I Built a Privacy-Safe Bridge Between Outlook and Apple Calendar
Why I Built This
Like many people working in enterprise environments, my work calendar lives inside Microsoft 365, while my personal life runs on Apple devices. Over time, that split became increasingly inconvenient. My wife and I wanted to see my work schedule on our personal devices so we could avoid conflicts with family plans, travel, and personal appointments. At the same time, I did not want to sign into my corporate Microsoft account on those personal devices, and I wanted to expose as little work data as possible.
What I ended up building was a small but surprisingly effective system: a read-only, auto-updating calendar bridge from Outlook to Apple Calendar. It uses Power Automate to read my work calendar, generate an ICS calendar file, publish that file to Dropbox, and then expose it through a direct link that Apple Calendar can subscribe to. The end result is simple to use, requires no local machine to stay on, and gives me a clean way to see my work schedule on my personal Apple devices and on my wife’s iPhone.
What I Wanted This Setup to Achieve
I had a few clear goals:
- I wanted to see my work schedule on my personal Apple devices.
- I did not want to sign into my corporate Microsoft account on those devices.
- I wanted the data exposure to be minimal and deliberate.
- I wanted the process to update automatically.
- I wanted to share that view with my wife so we could plan around work travel and important dates.
I also wanted this to run purely in the cloud, without depending on my laptop, desktop, or any other local workstation.
The Final Design
The final setup looks like this:
1. Outlook calendar in Microsoft 365
2. Power Automate scheduled flow
3. ICS file generated automatically
4. Dropbox file updated automatically
5. Apple Calendar subscribed to direct Dropbox ICS link
This works because Apple Calendar understands standard ICS feeds, Power Automate can build an ICS file, and Dropbox can serve a direct file link in a format Apple Calendar accepts.
Why I Did Not Use a Direct Microsoft-to-Apple Sync
My original thought was to find some way to expose a minimal view of my Outlook calendar directly, but there were a few problems with that approach.
- First, I did not want my Apple devices to have access to my enterprise account.
- Second, built-in OneDrive and SharePoint links turned out not to be reliable as Apple Calendar subscription endpoints. Their links tend to go through browser views, redirects, or authentication layers, which Apple Calendar does not handle well for subscribed ICS calendars.
- Lastly, my Enterprise environment does not allow me to share or publish my Outlook Calendar, and I support this cybersecurity control.
That is why I shifted from “calendar sync” to “read-only calendar publishing”. This approach gave me far better control over privacy and behaviour. I asked Copilot for advice, and it suggested I use Power Automate. I had never heard of it before, and it operates within my enterprise enviroment. It is a pretty cool application that allows you to create automated workflows between applications and services, both Microsoft and non-Microsoft. So I gave it a whirl, with assistance from Copilot, and this is what we came up with.
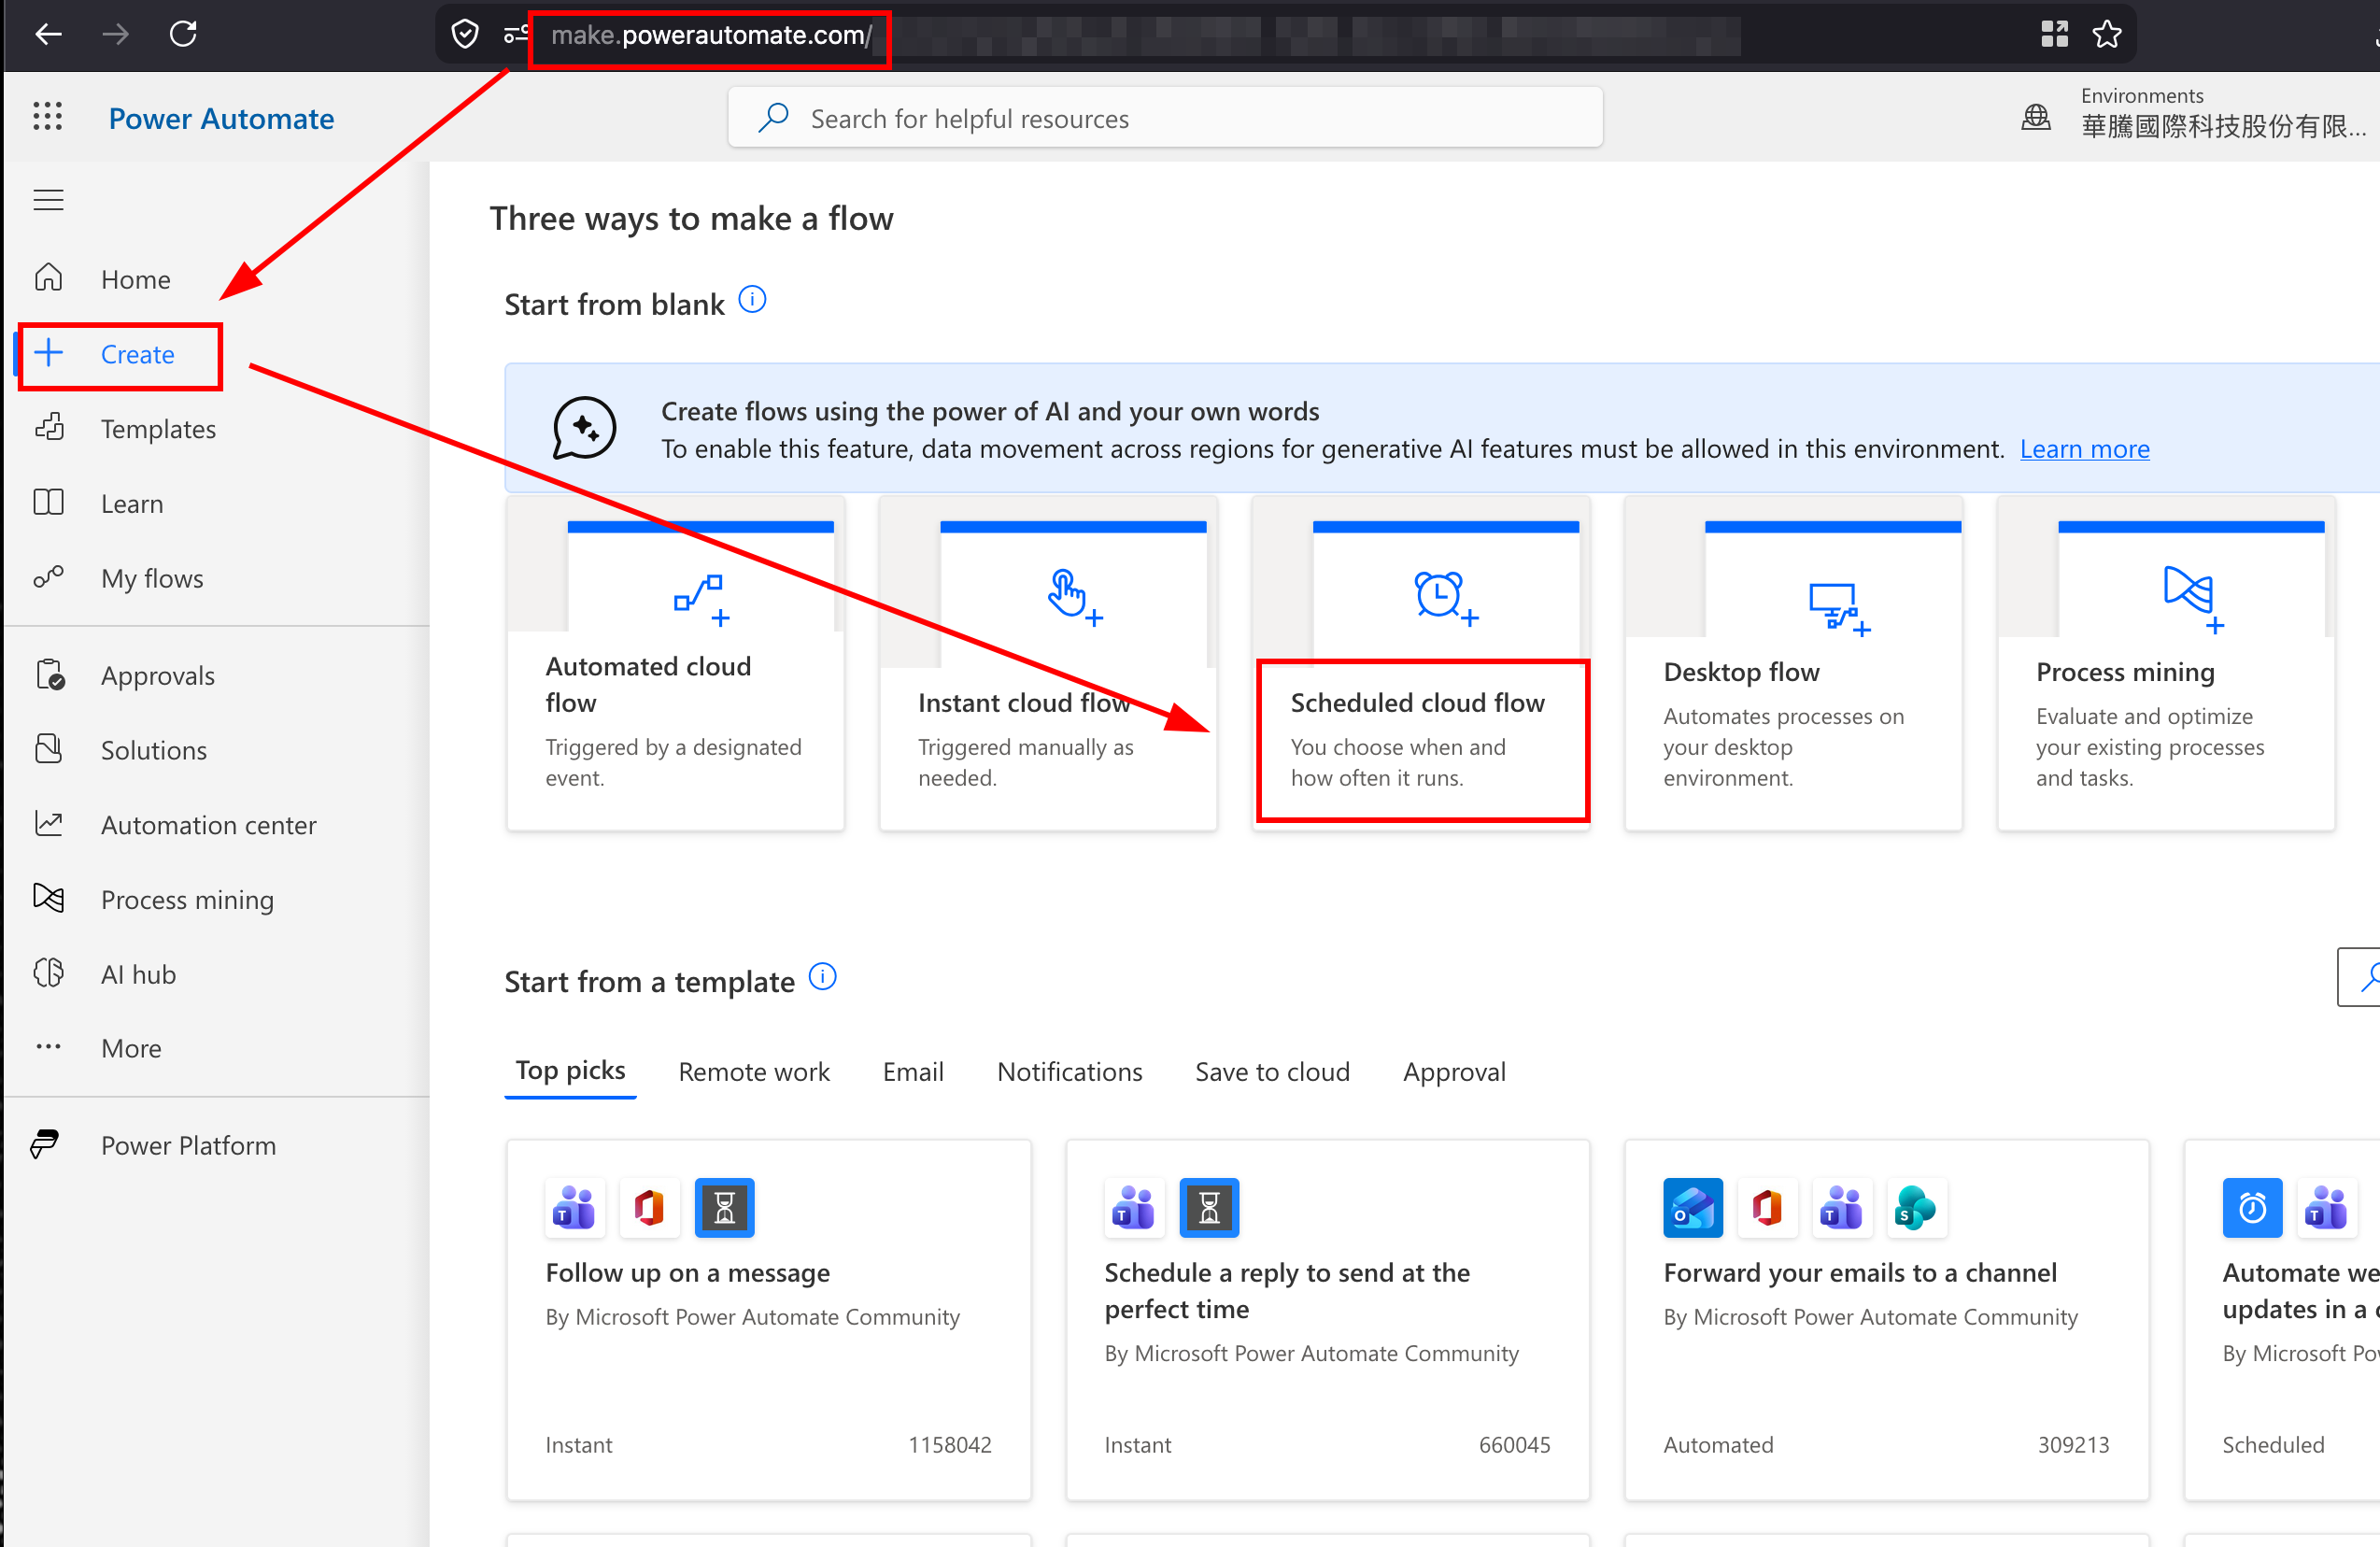
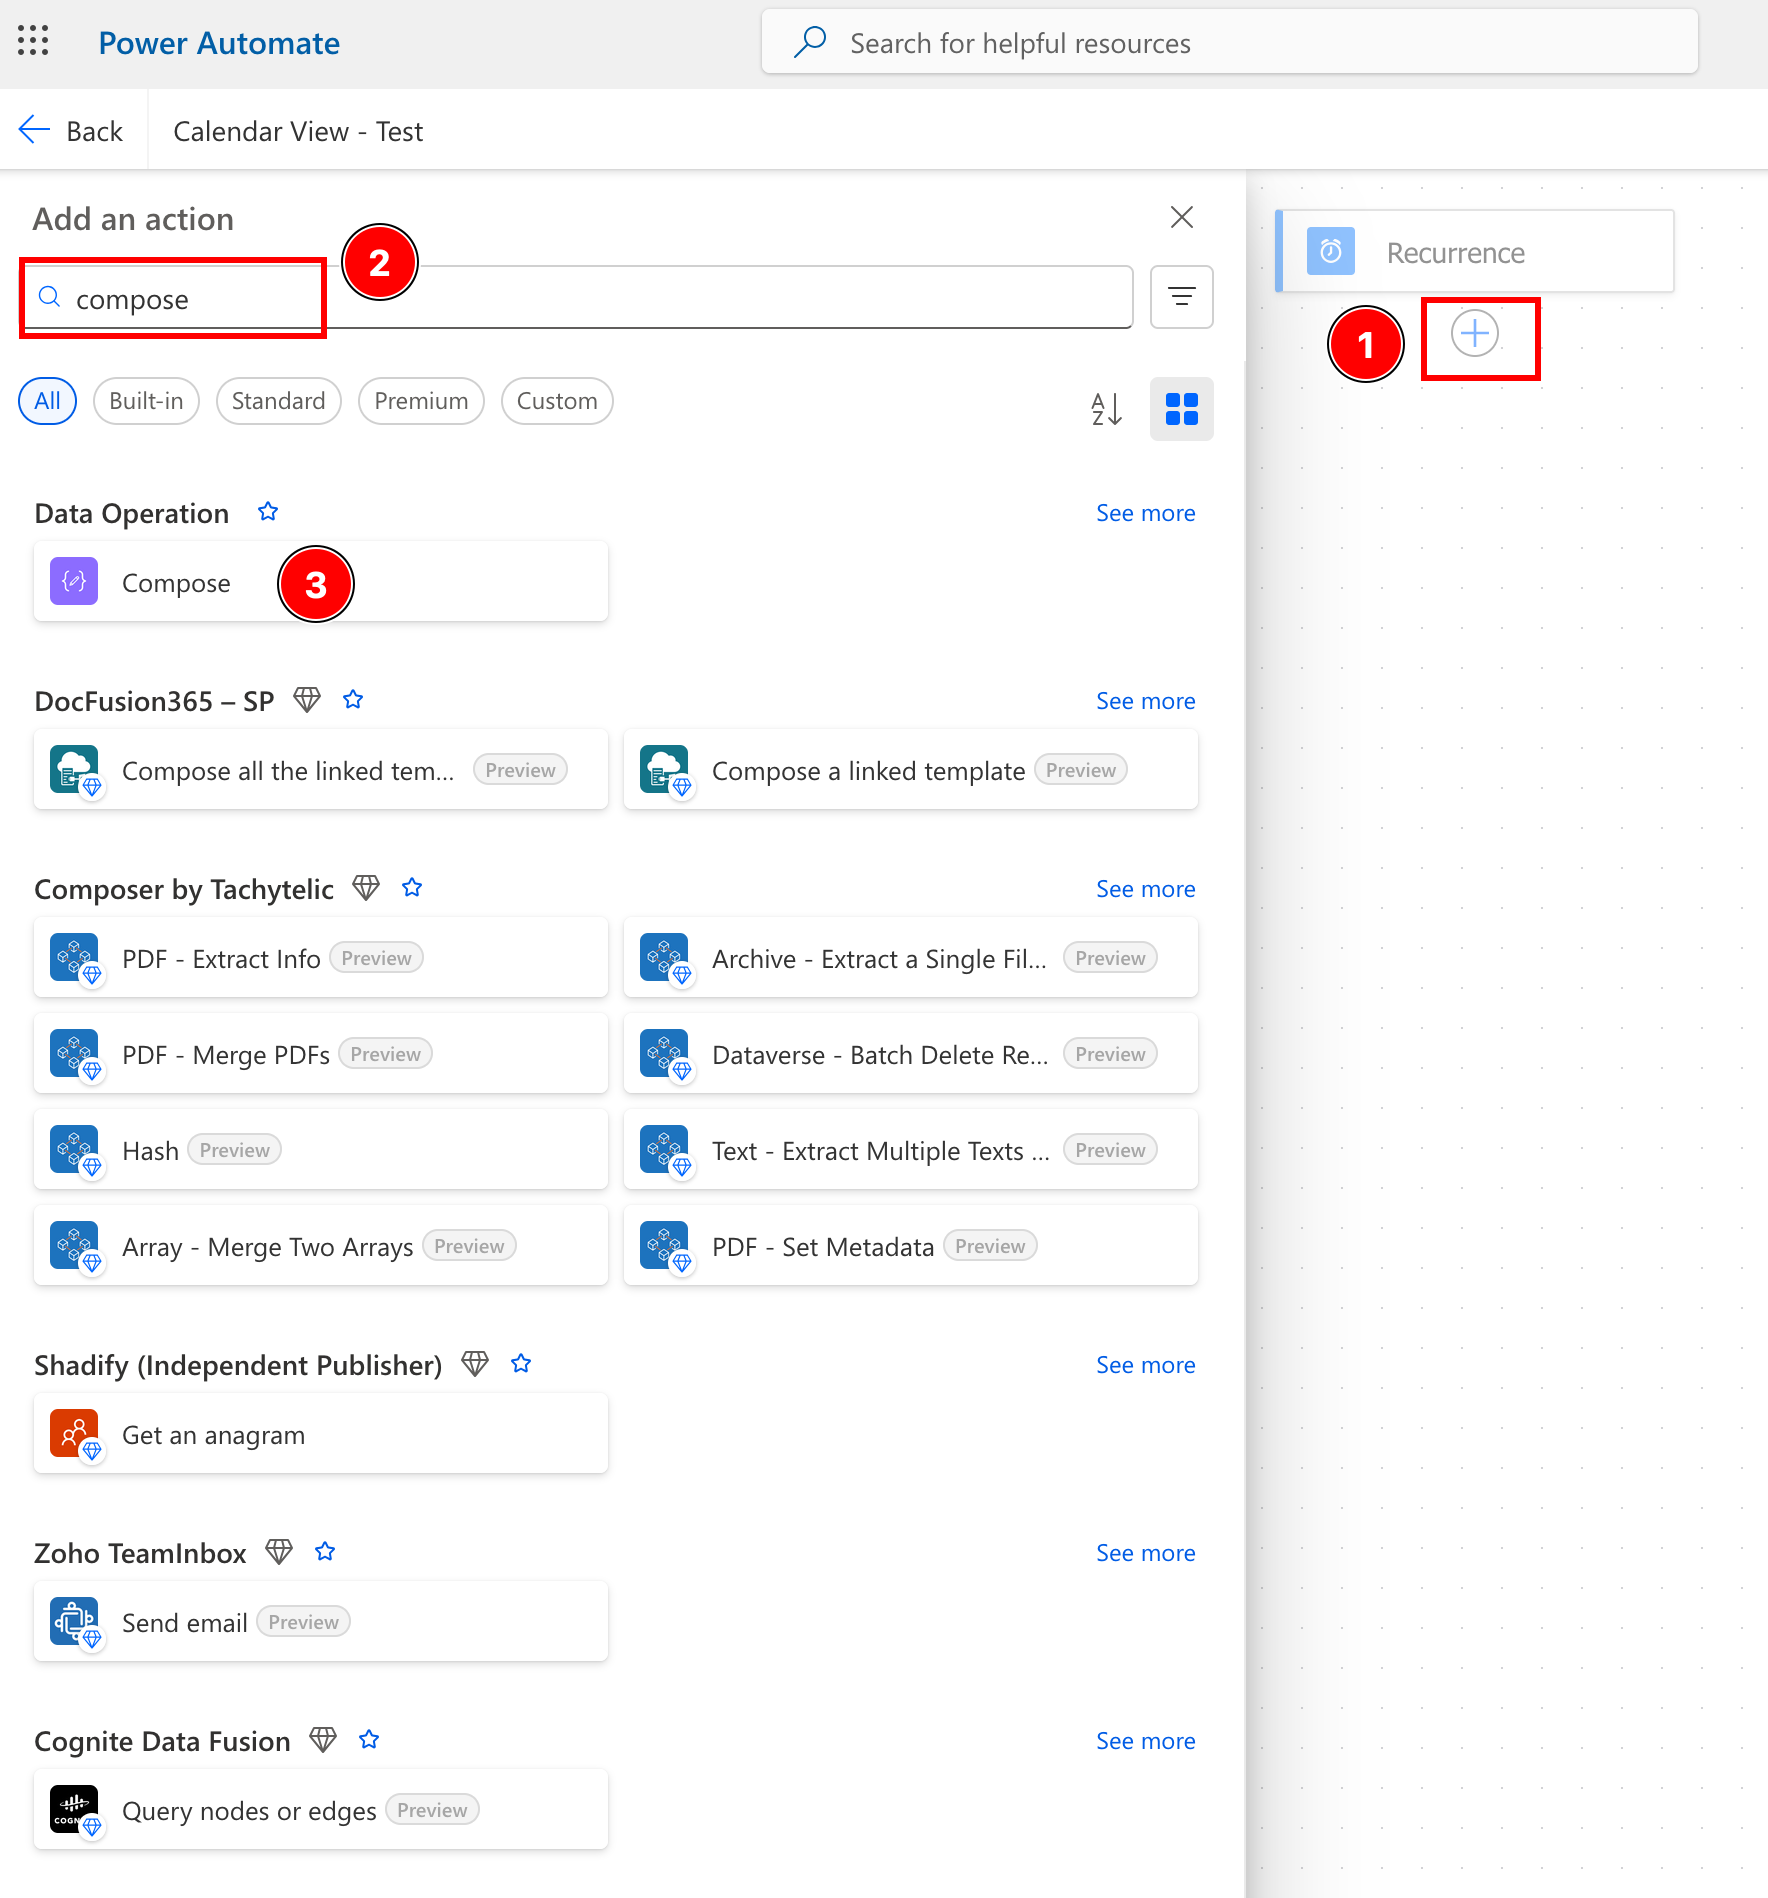
Step 1: Create a Scheduled Cloud Flow in Power Automate
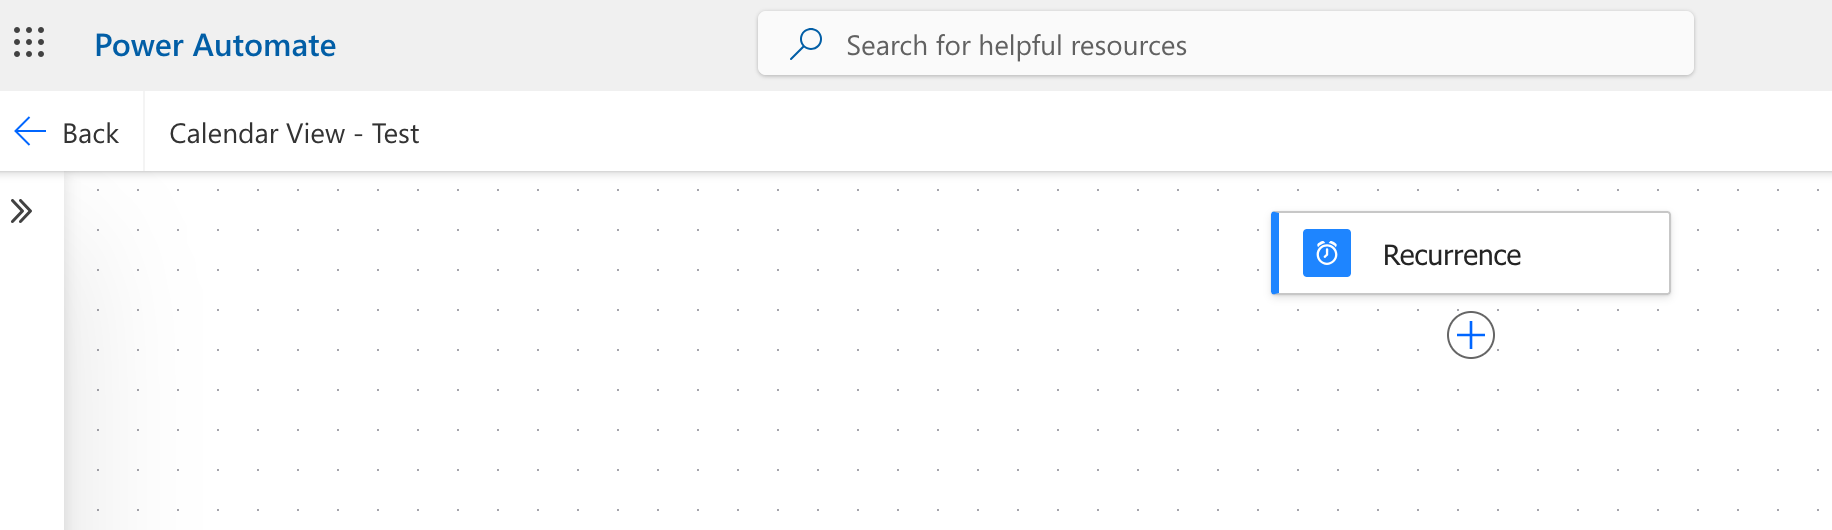
The first step is to create a scheduled cloud flow in Power Automate.
- This flow acts like a cloud-hosted cron job. It runs on Microsoft’s servers, not on your own machine, so you do not need to keep a computer switched on.
- When creating the flow, I used a recurrence trigger and set it to run every four hours. You could also choose every six hours if you want slightly fewer refreshes.
- go to https://make.powerautomate.com
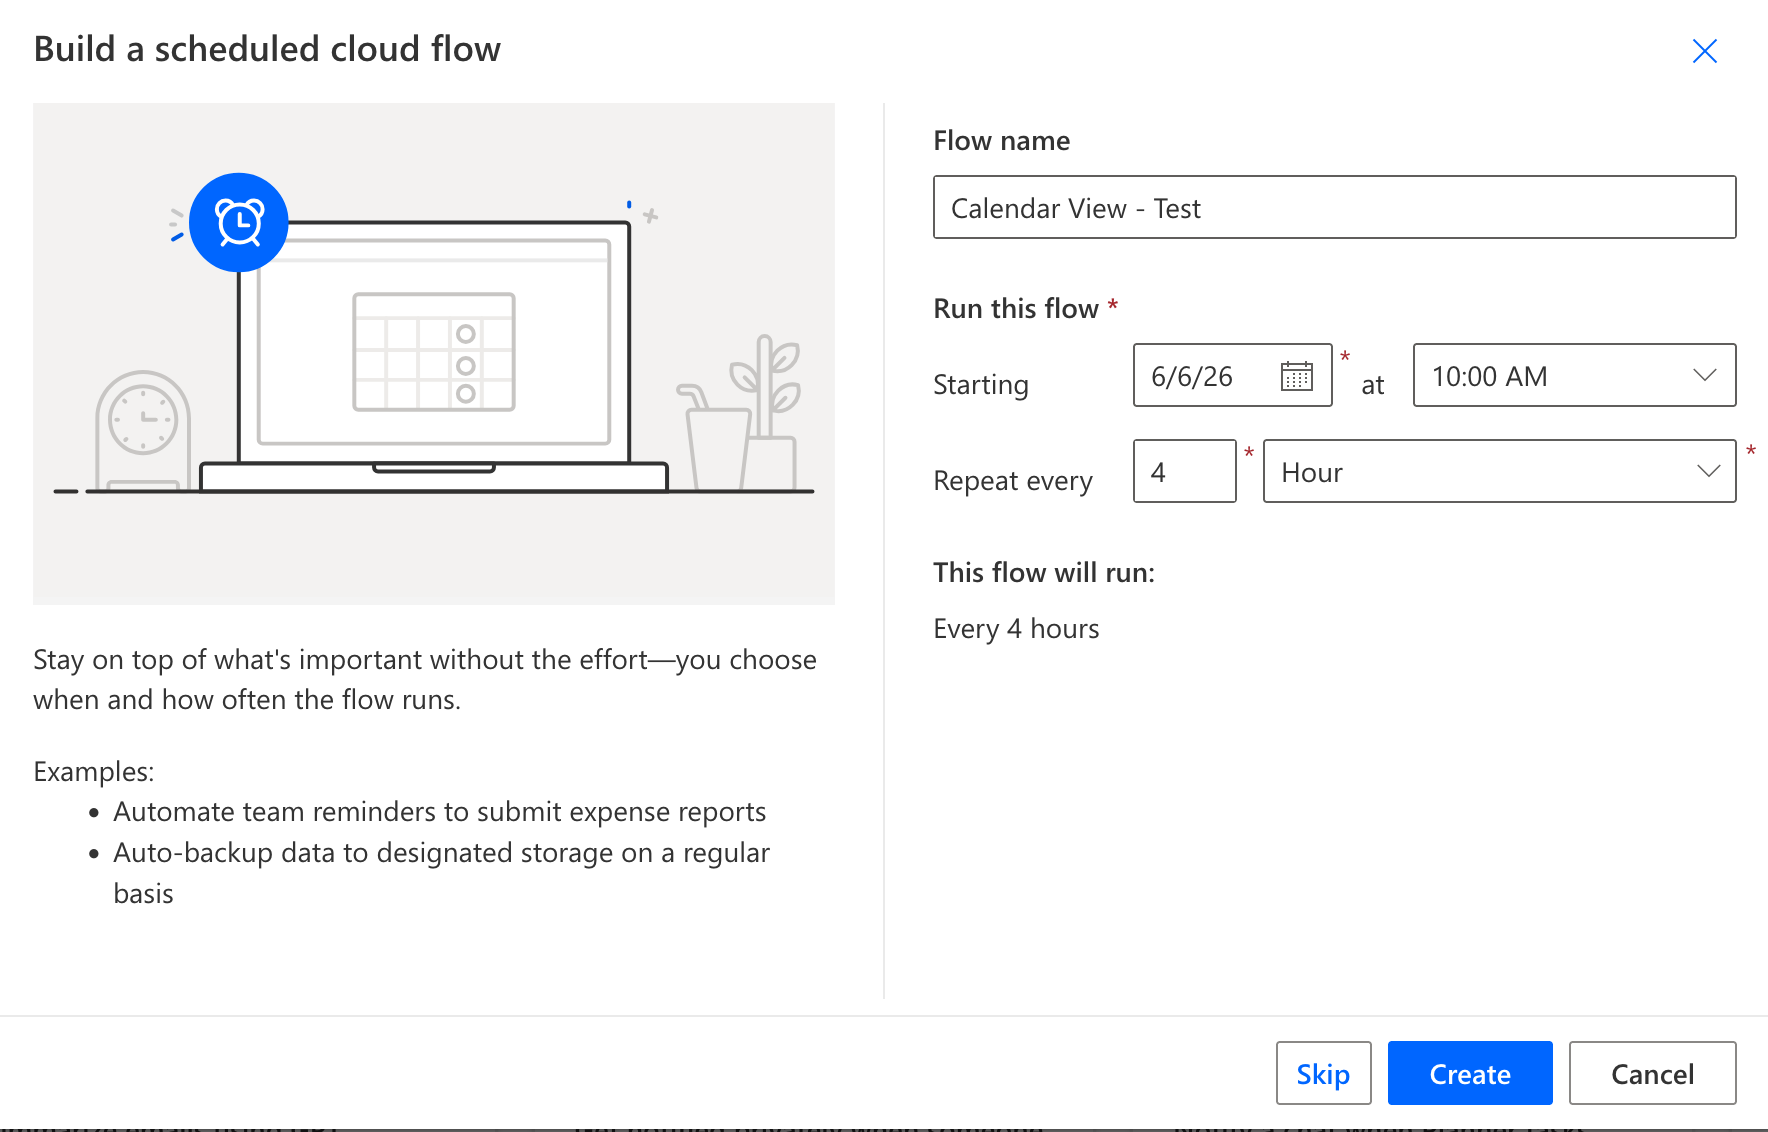
The recurrence values looked like this:
1. Frequency: Hour
2. Interval: 4
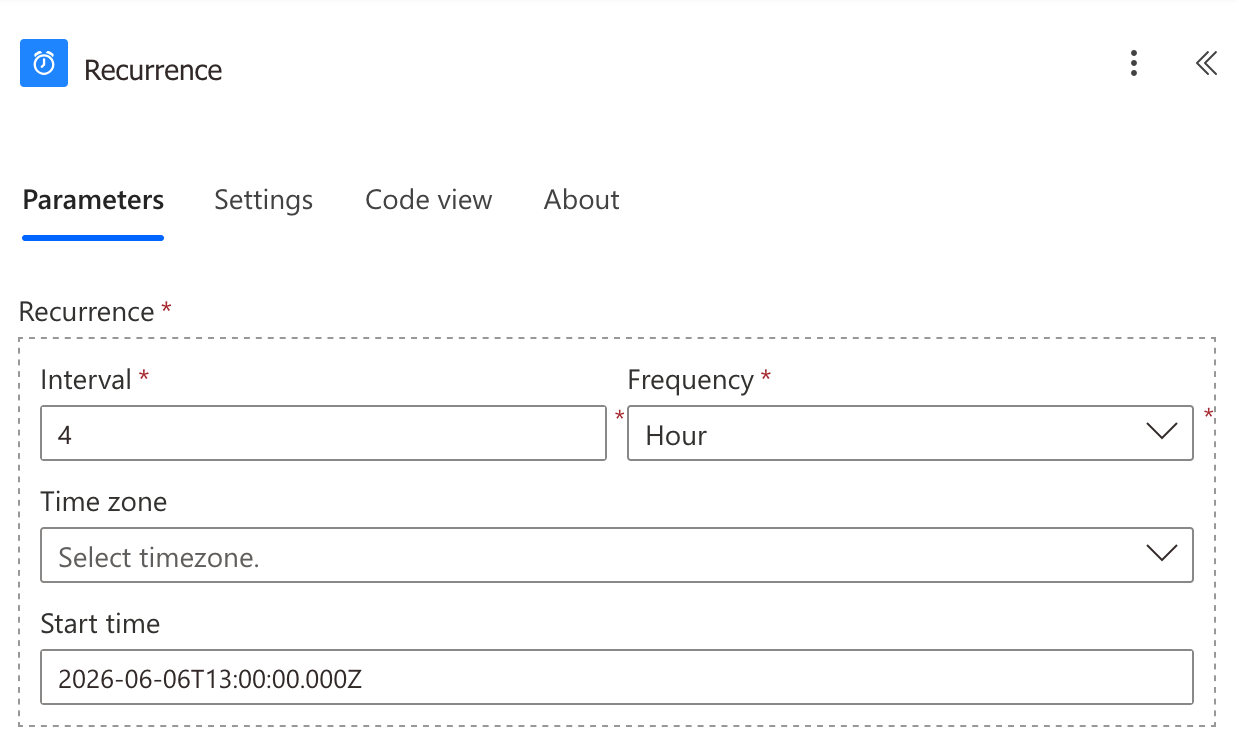
This means the flow wakes up automatically every four hours and rebuilds the ICS calendar file.
Step 2: Create a Rolling Time Window
The next step is to tell Power Automate what range of calendar events to export.
I chose to include events from the current moment up to 180 days in the future. This gave me enough visibility for work travel, conferences, and family planning, without making the exported file too large or cluttered.
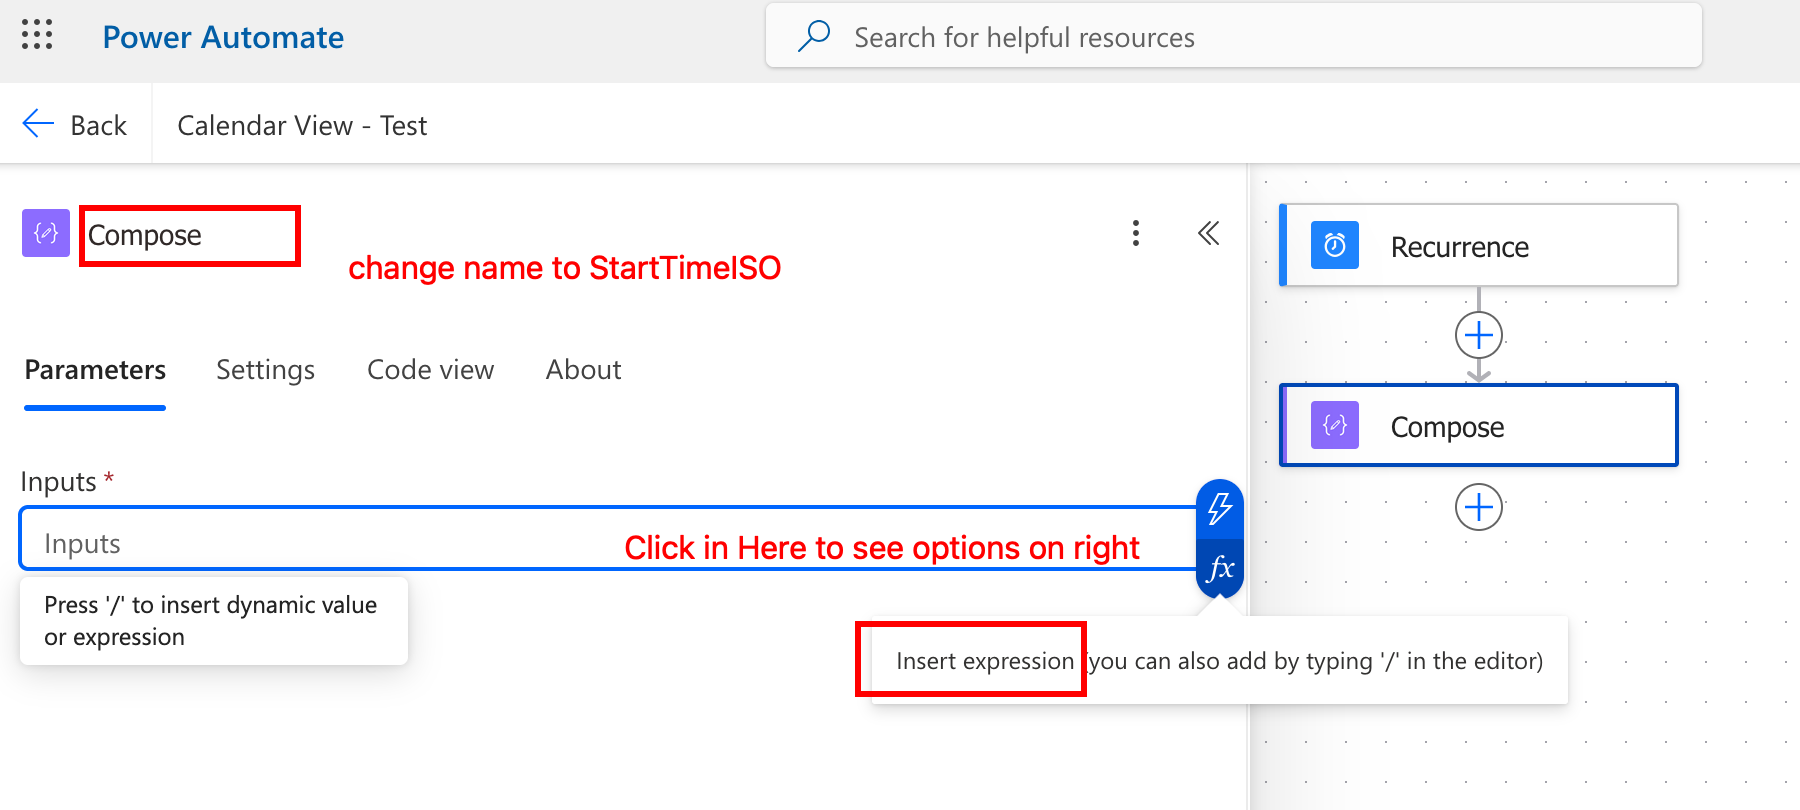
To do this, I created two helper actions using Compose.
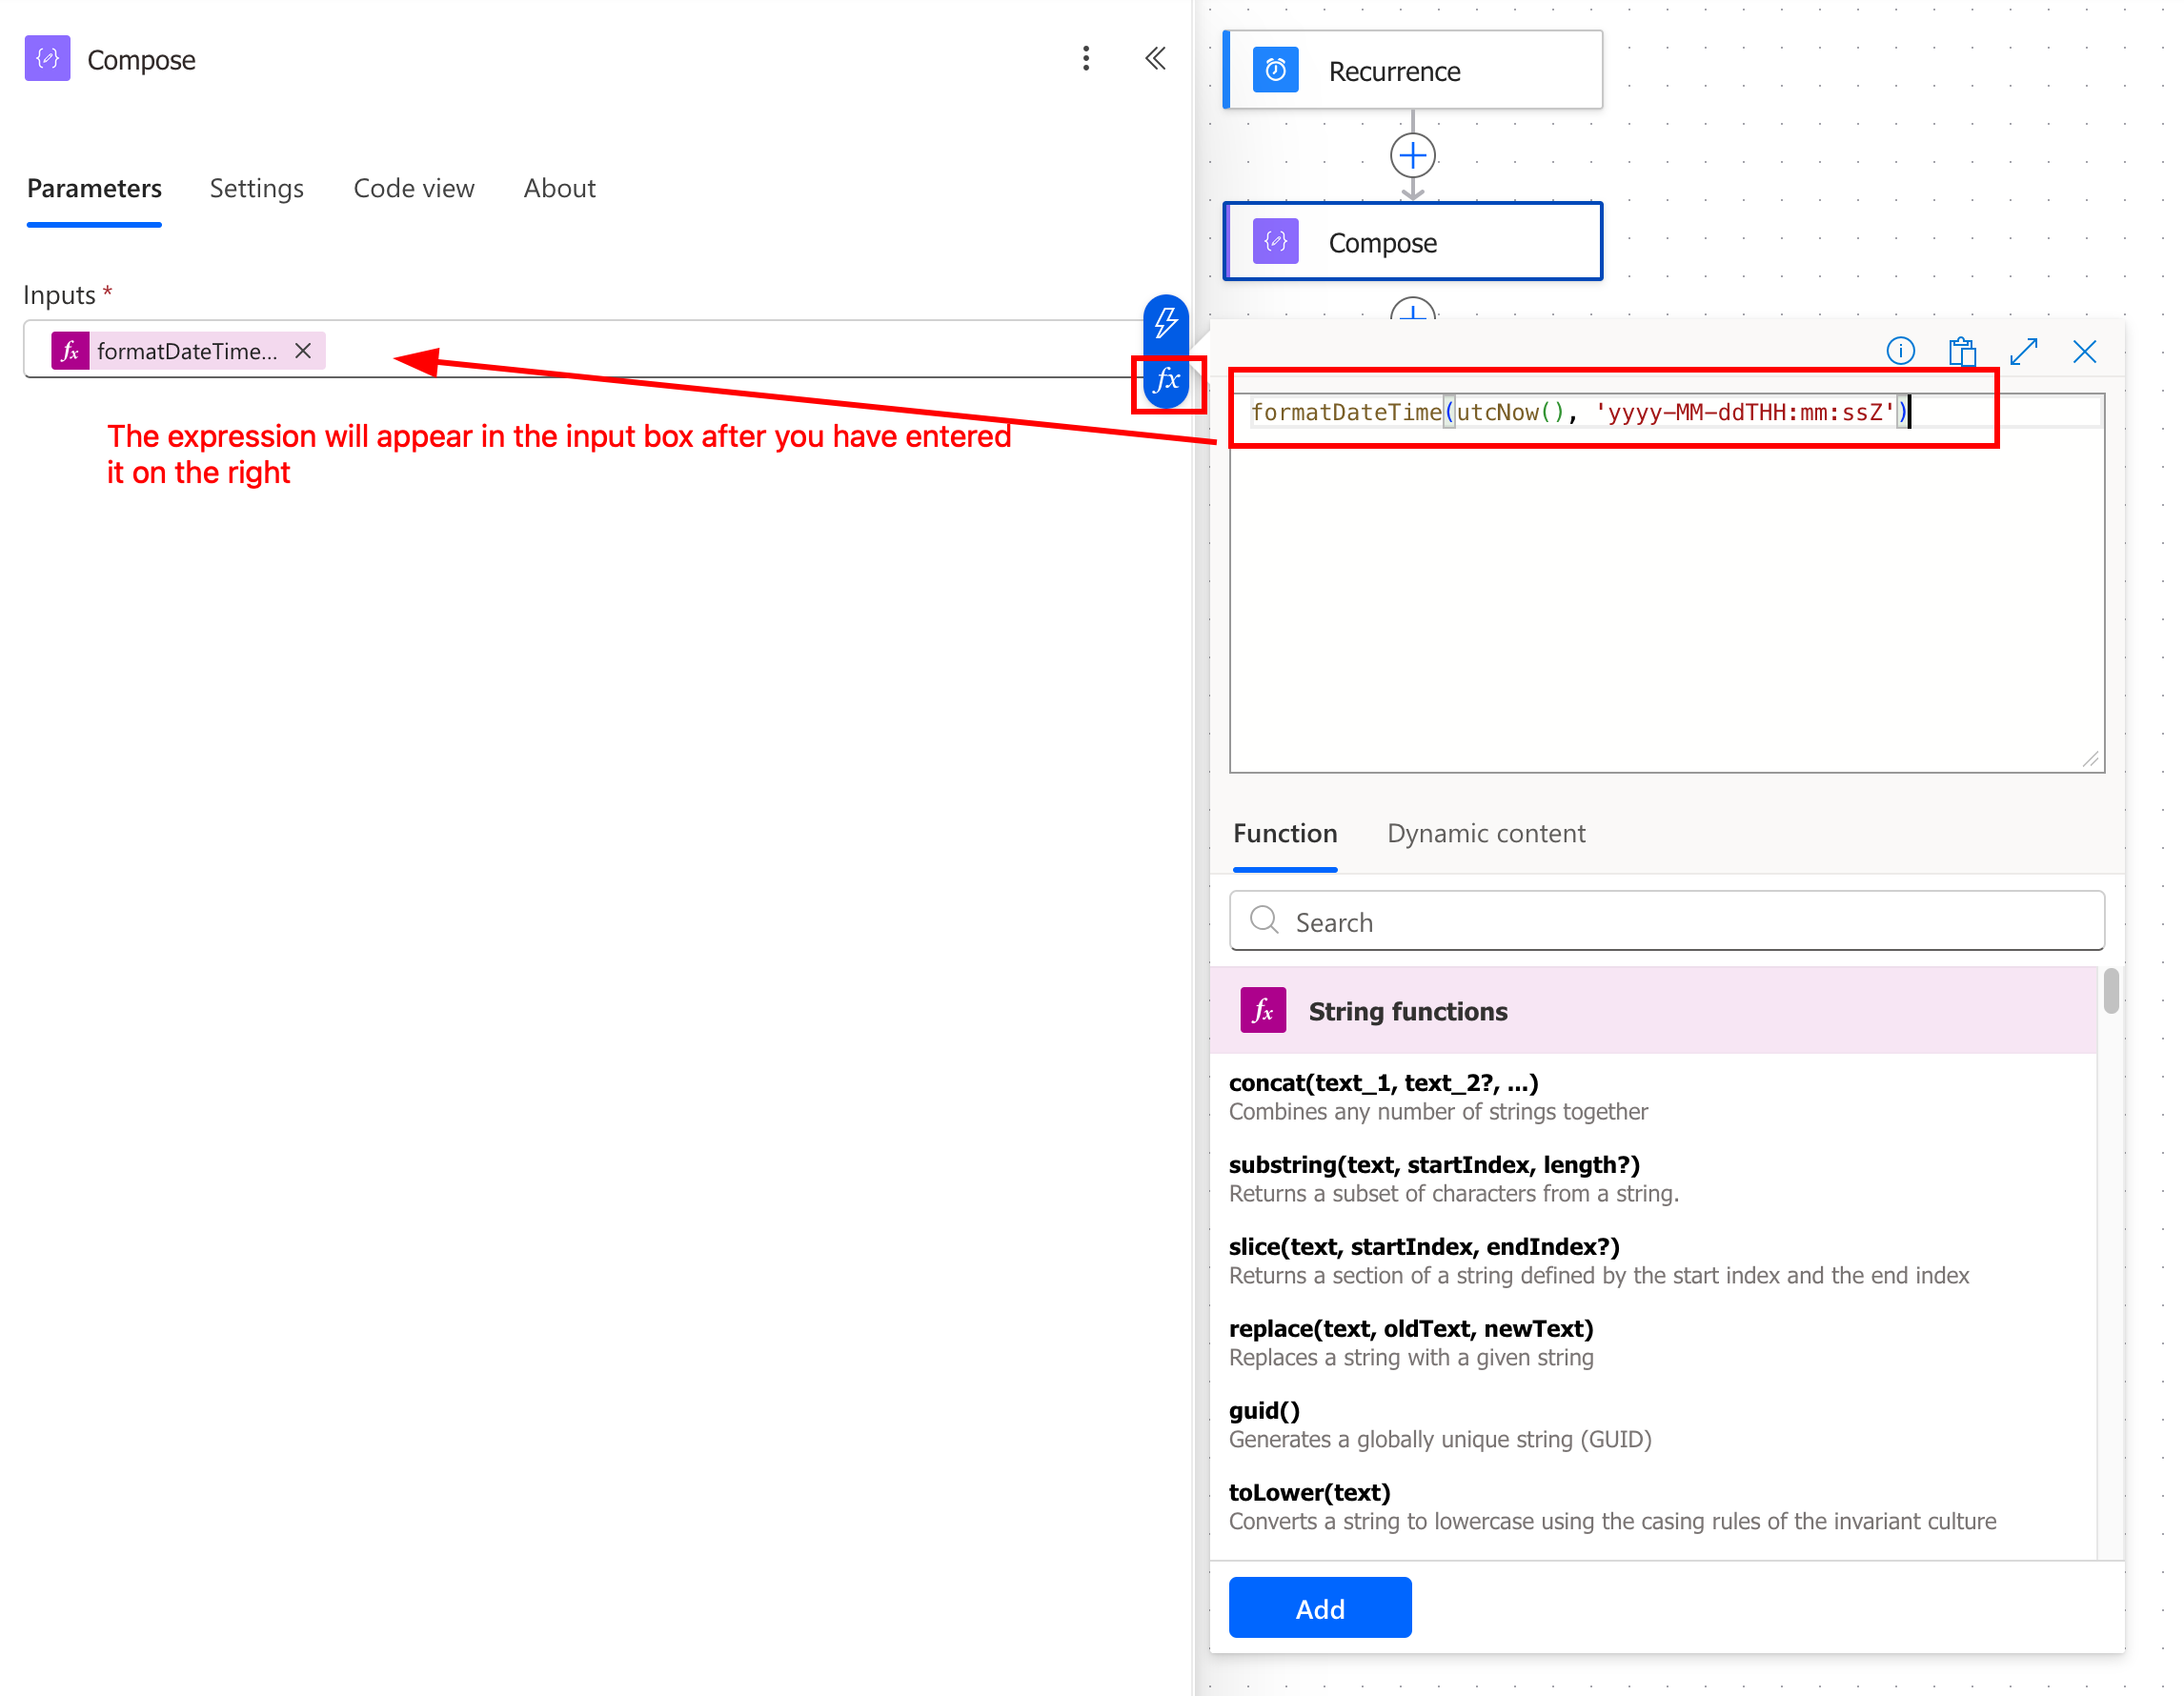
The first helper action was called StartTimeISO and used this expression:
formatDateTime(utcNow(), 'yyyy-MM-ddTHH:mm:ssZ')
OPTION This is the code to start the capture ninety days in the past. I experimented between 14 and 180 days and found a nice balance at 30 days, which provided some historical context when required without excessive runtimes or file transfers.
formatDateTime(addDays(utcNow(), -90), 'yyyy-MM-ddTHH:mm:ssZ')
The second helper action was called EndTimeISO and used this expression to capture events 6 months in the future. I eventually increased it to 365 days for a full year.
formatDateTime(addDays(utcNow(), 180), 'yyyy-MM-ddTHH:mm:ssZ')
This step mattered because the Outlook action I used did not accept raw expressions typed directly into its date fields. It needed real values passed in from other actions.
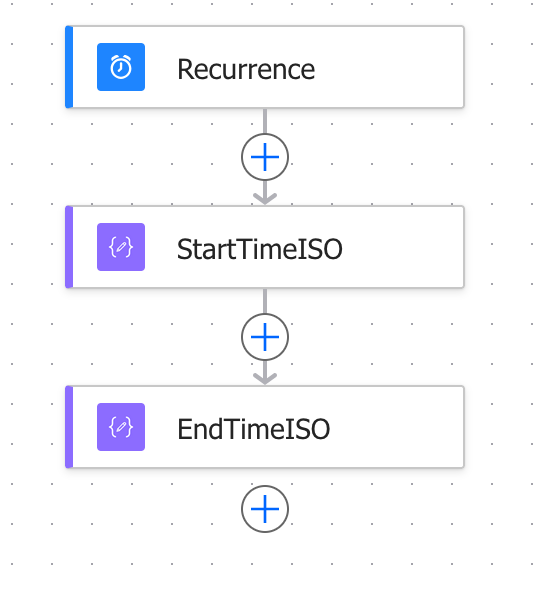
Your flow should now look like this:
Step 3: Retrieve Outlook Calendar Events
Once the time window was defined, I added the Outlook action:
Get calendar view of events (V3)
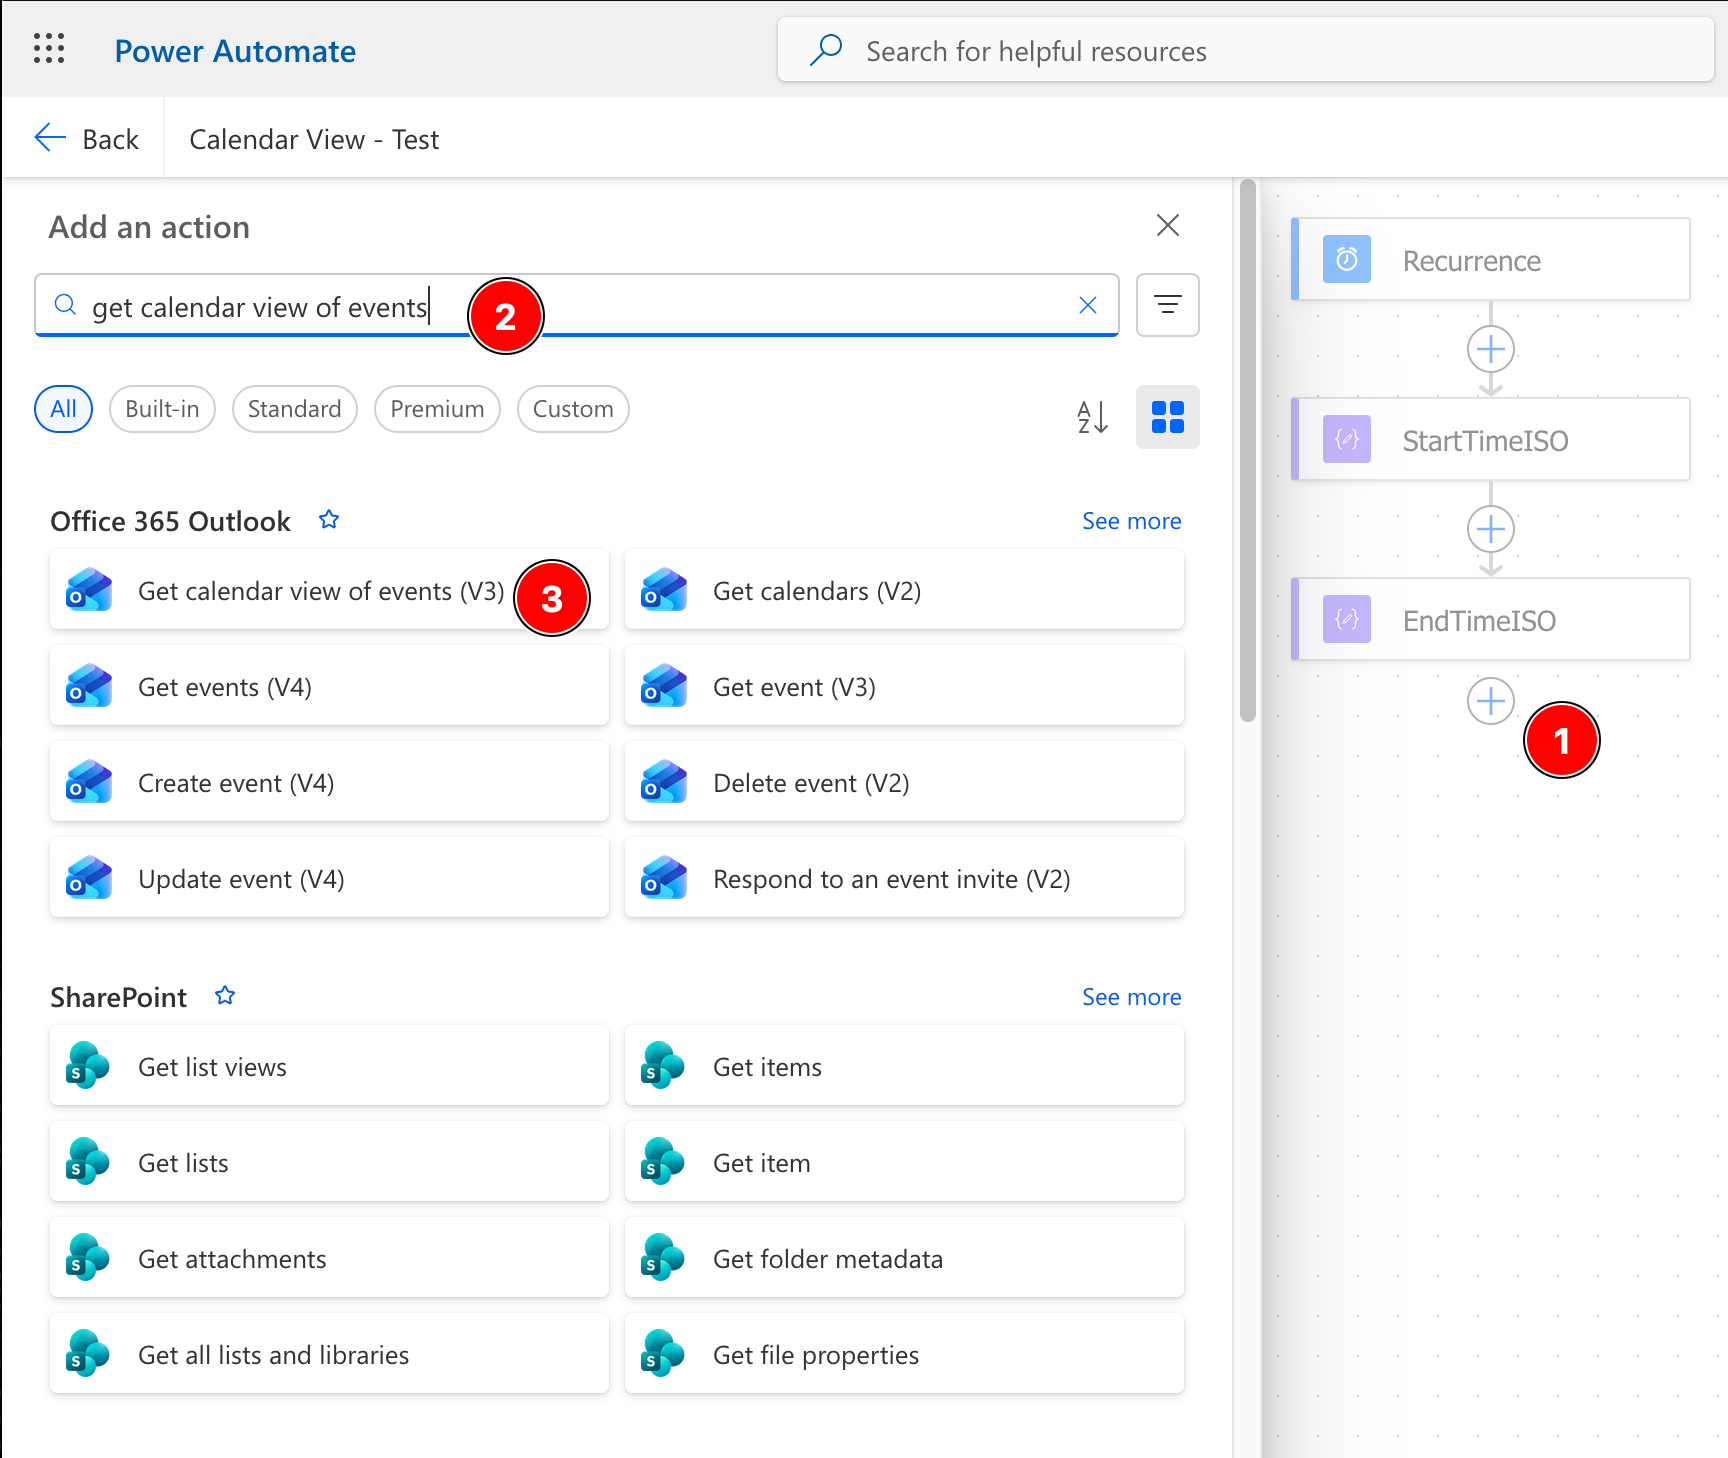
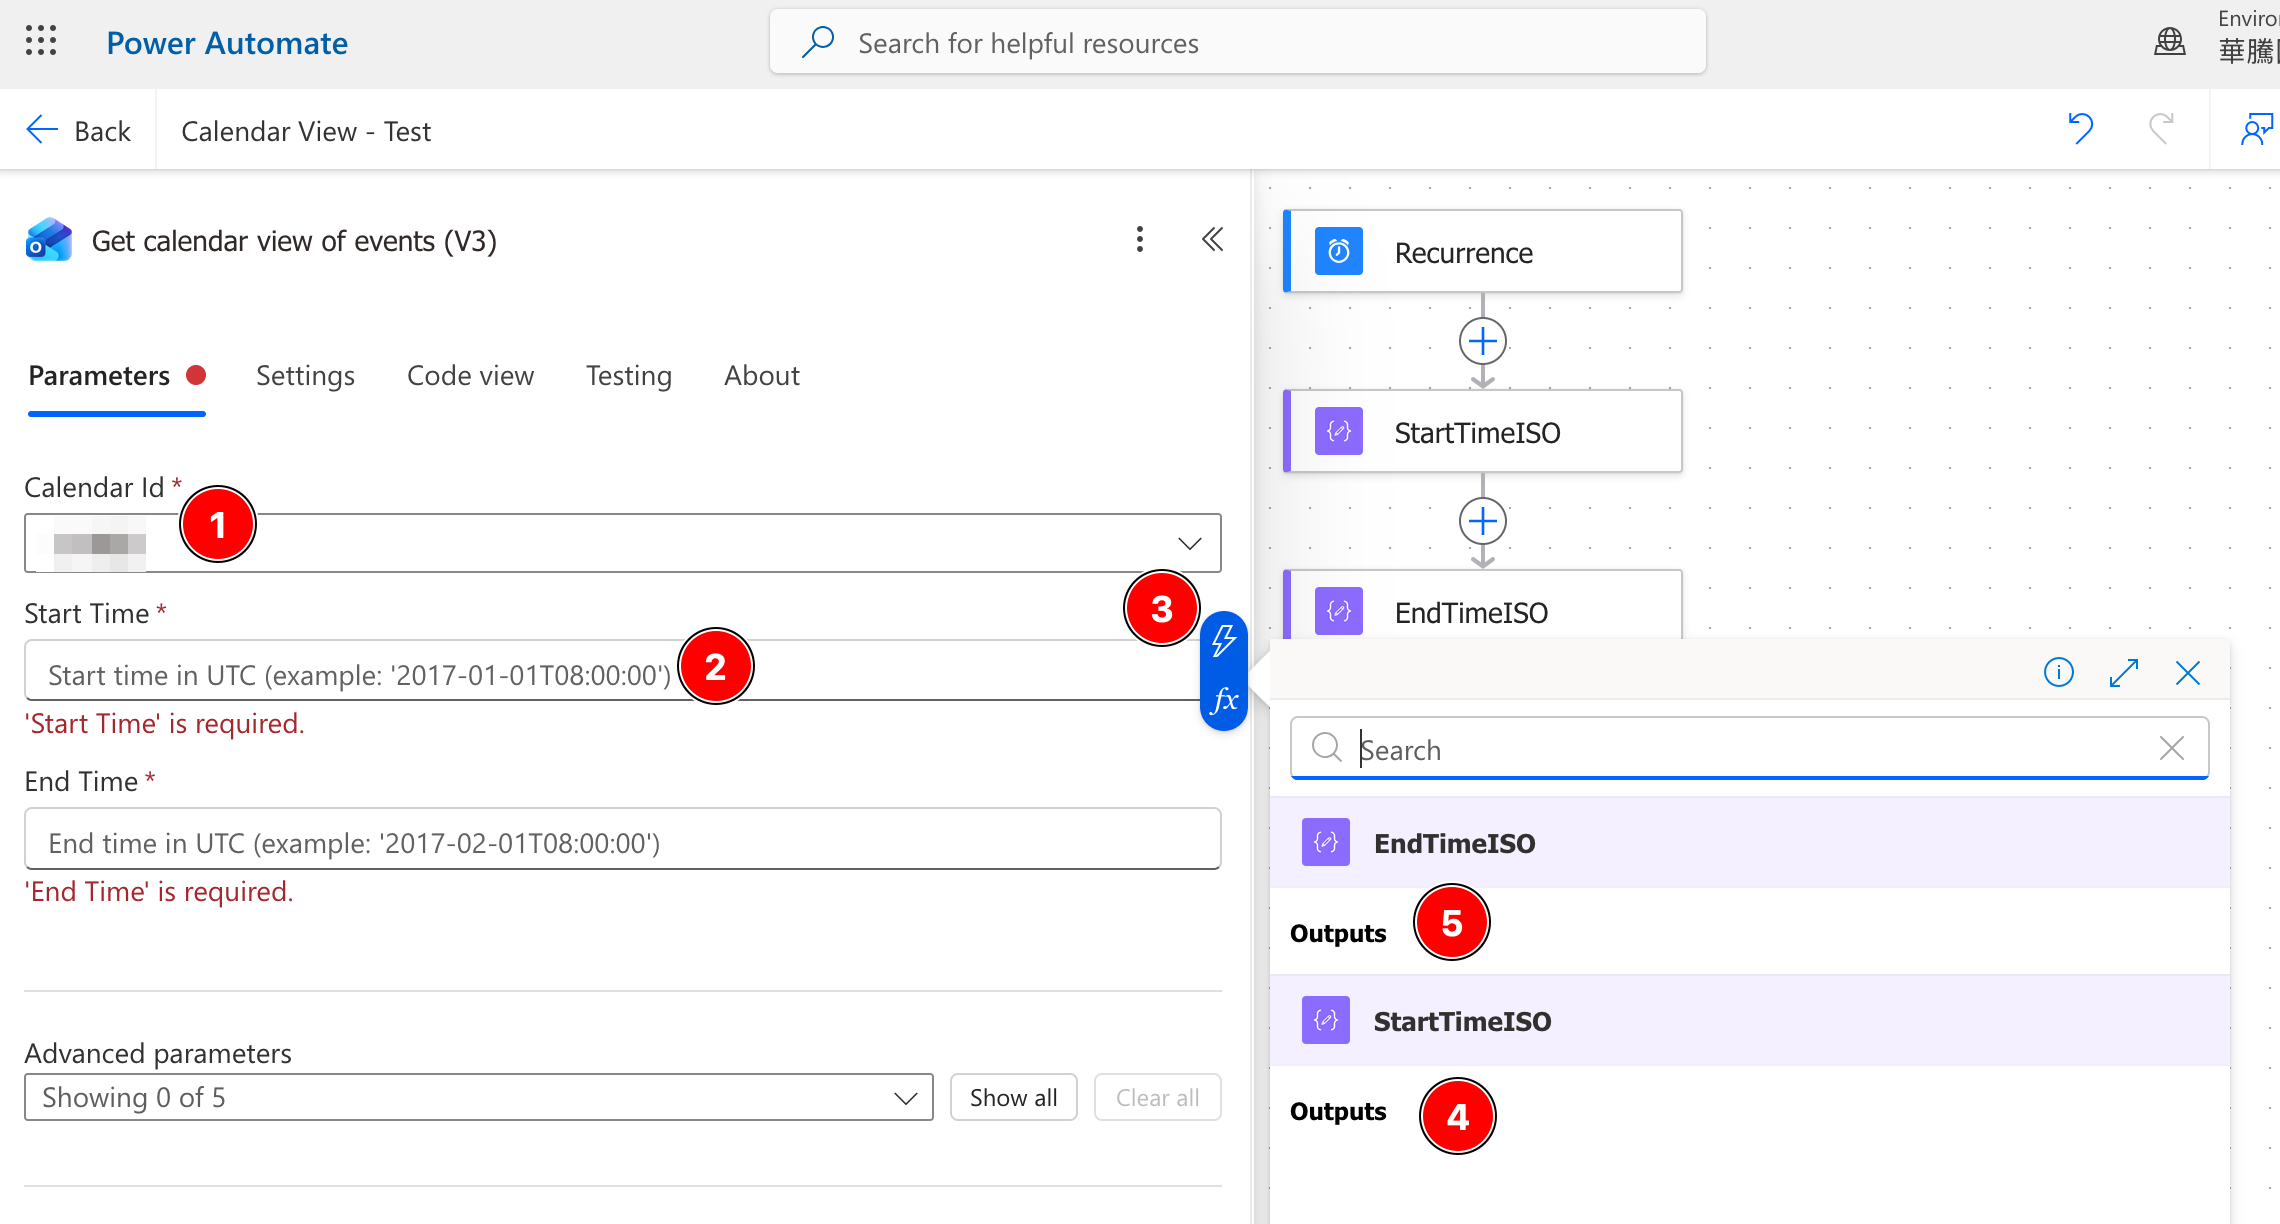
Next, select the calendar from your Outlook Account that you want to sync.
Set the Start Time and End Time, but clicking inside the text box, then selecting the Lightning button on the right to display previously set variables. Make sure you click “Outputs” for the appropriate StartTimeISO and EndTimeISO

At this point, the flow was capable of retrieving all the calendar entries in that rolling 180-day window.
A small but important detail is that the V3 version of this Outlook connector returns the start and end values as strings. That affects how the event formatting needs to be done later.
ANOTHER ERROR: MISSING REPEATING ENTRIES
Get calendar view of events (V3) returns a maximum of 256 events per call, and this limit isn’t mentioned in the connector documentation. My file was stopping at exactly 256 entries — a suspiciously round power of two — and everything past that, sorted by start date, was being thrown away. The recurring occurrences that landed in the discarded tail were my “missing” events.
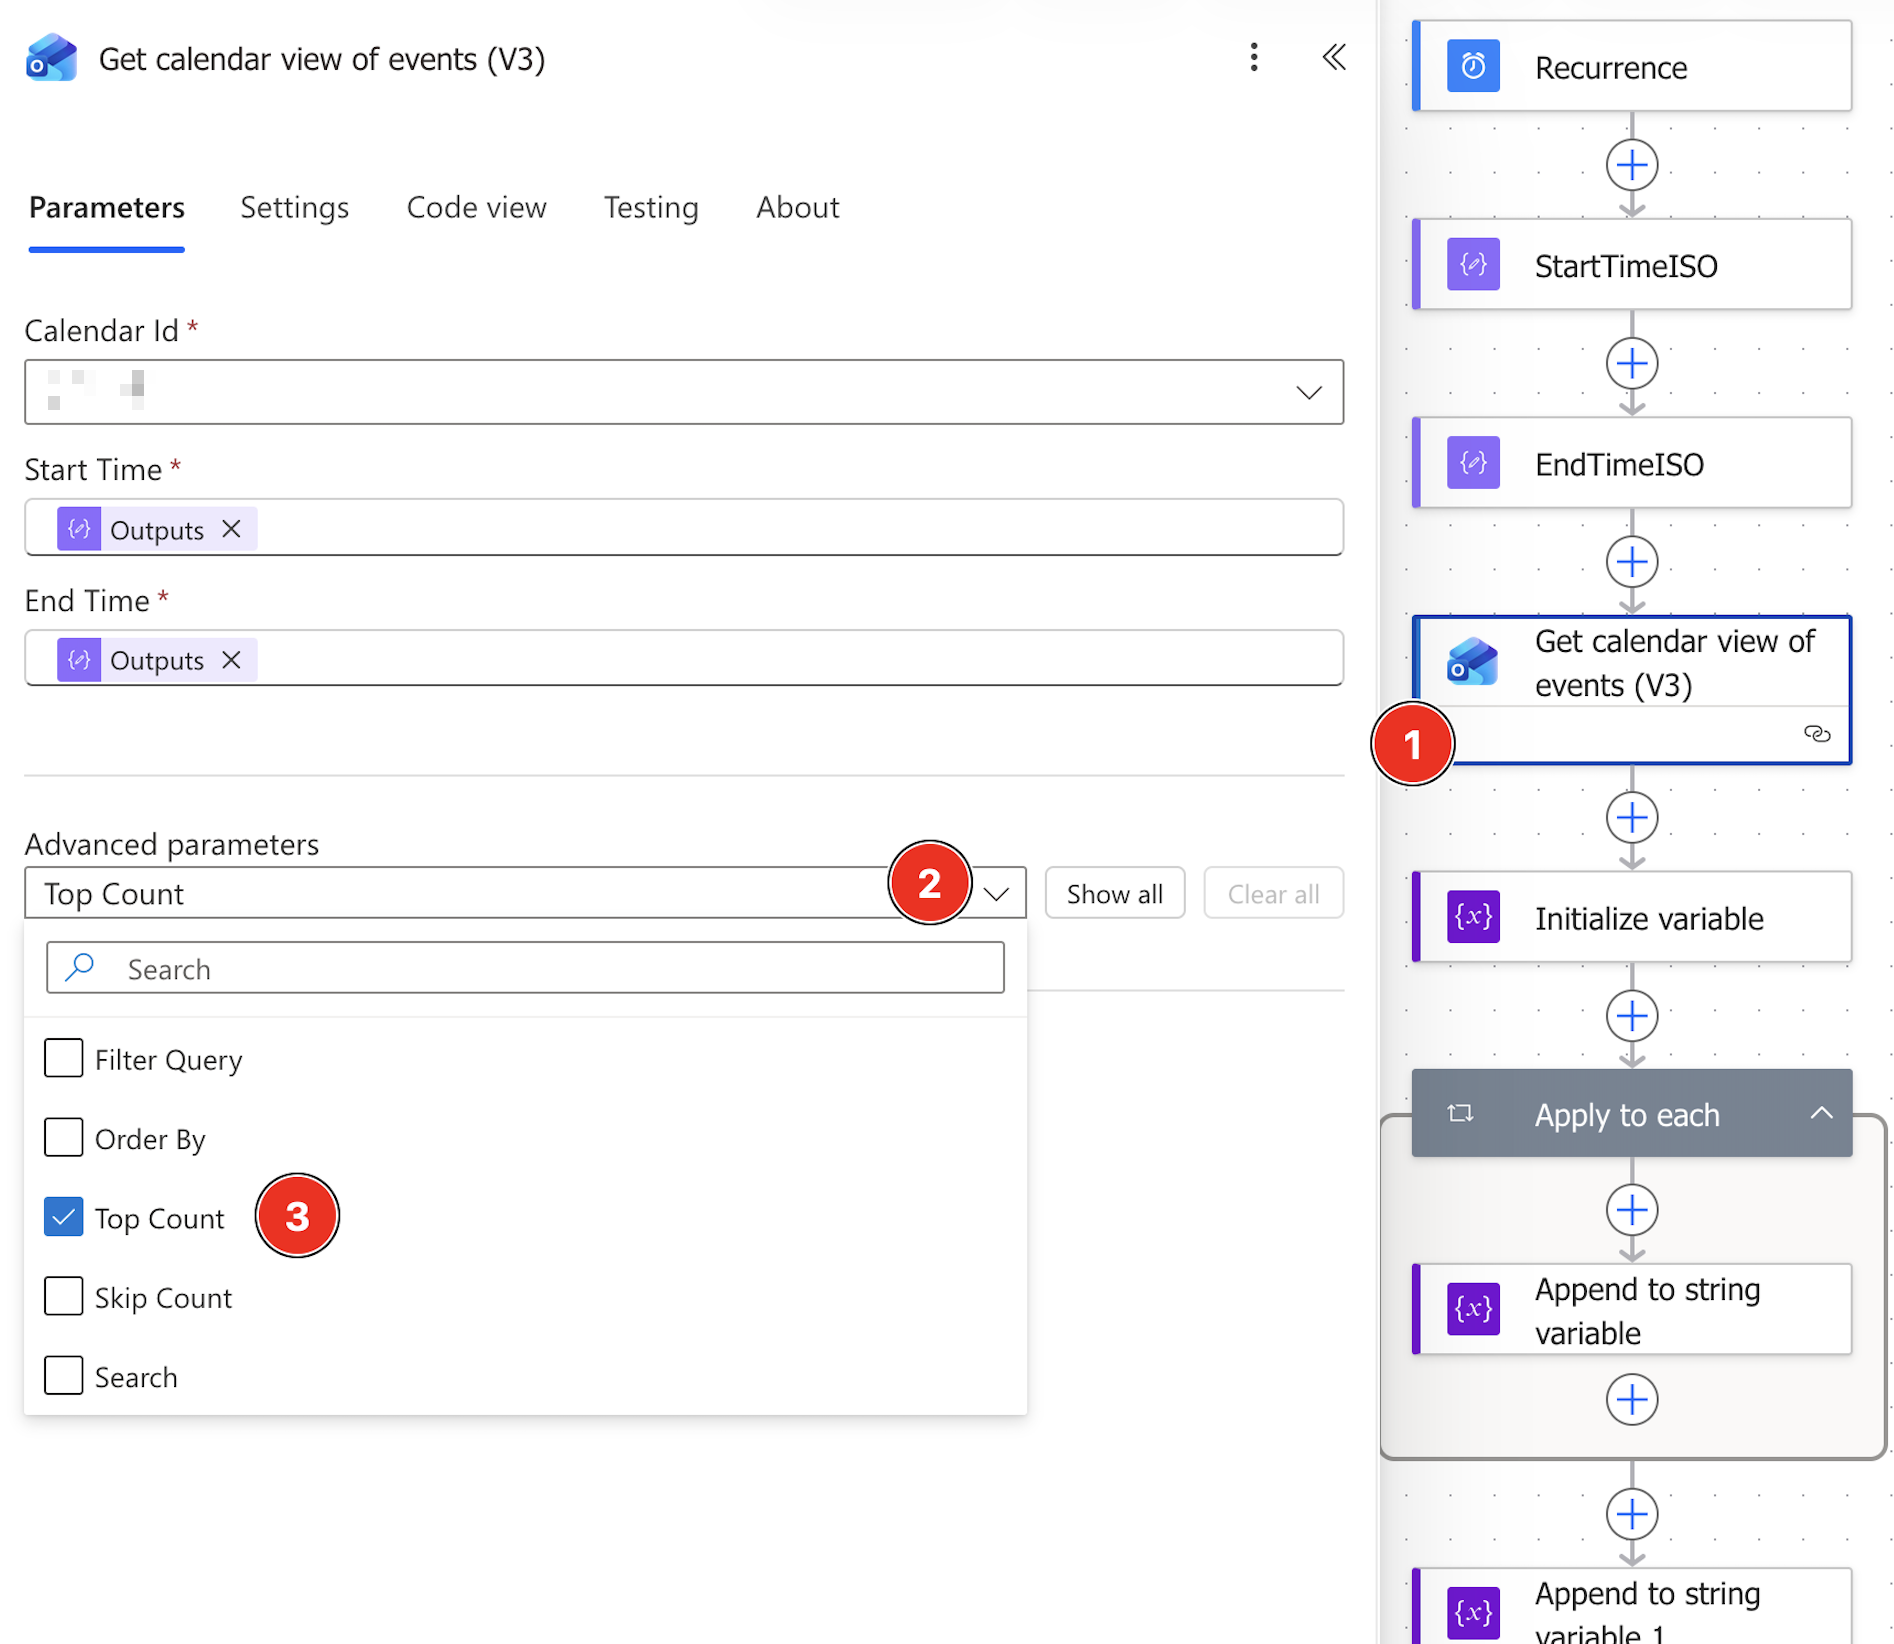
The action exposes no pagination toggle in the newer designer, so the lever that actually works is the Top Count advanced parameter:
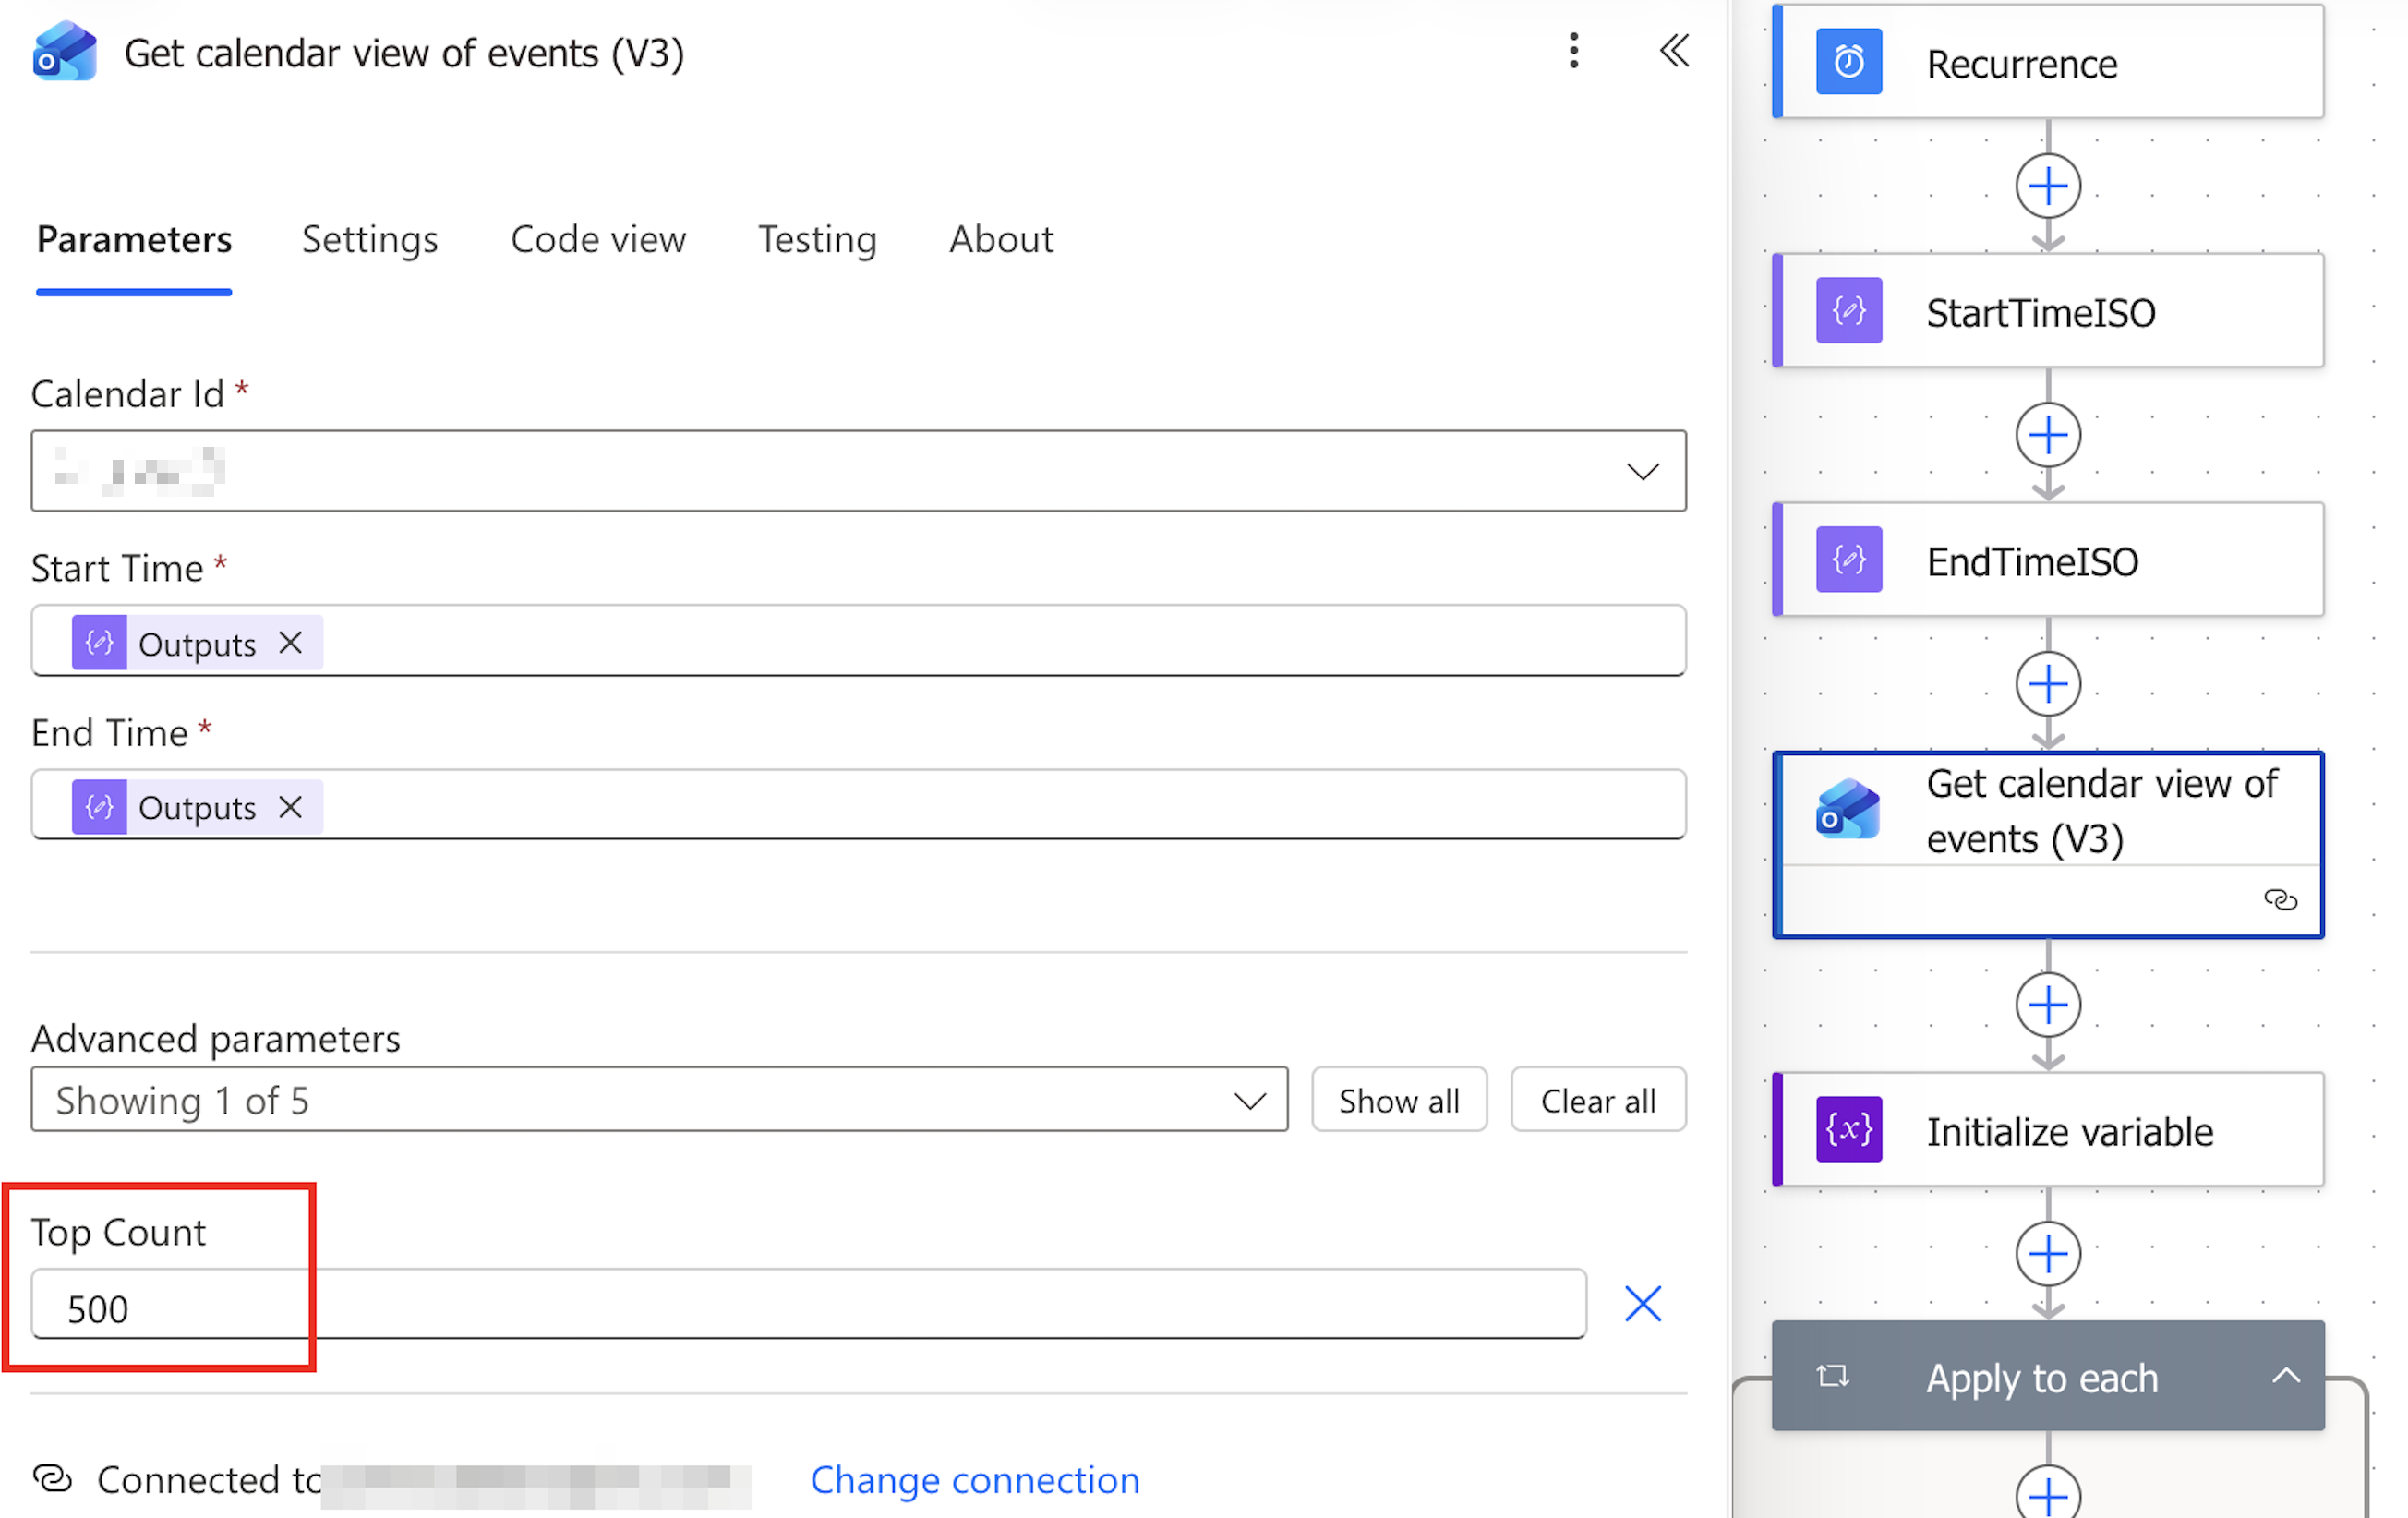
Parameters → Advanced options → Top Count → 500
Setting it to 500 lifts the cap and returns the full set. Size it to comfortably exceed your real event count for the window. A few caveats worth knowing:
- The cap is silent — you get a successful run with truncated data, never an error. The only way you find out is by counting (see below).
- Scheduled/recurrence-triggered flows have platform limits in the low thousands, so don’t assume you can crank this arbitrarily high.
- Whatever value you choose becomes your new ceiling. Mine sits around 350 events for a rolling year, so 500 gives me headroom without being reckless.
Because the truncation is silent, I keep a one-liner to check how close I am to the Top Count limit. Just count the VEVENT blocks in the generated file:
grep -c "BEGIN:VEVENT" calendar.ics
Or pull the live feed and count in a single step, which checks exactly what a subscriber receives:
curl -sL "<your-direct-download-link>" | grep -c "BEGIN:VEVENT"
grep is case-sensitive, so match the uppercase BEGIN:VEVENT in the file (or add -i). If the number is comfortably under your Top Count, you’re capturing everything. If it lands right on a round cap — 256, or whatever you set Top Count to — you’re truncating again, and it’s time to raise the limit or shorten the date window.
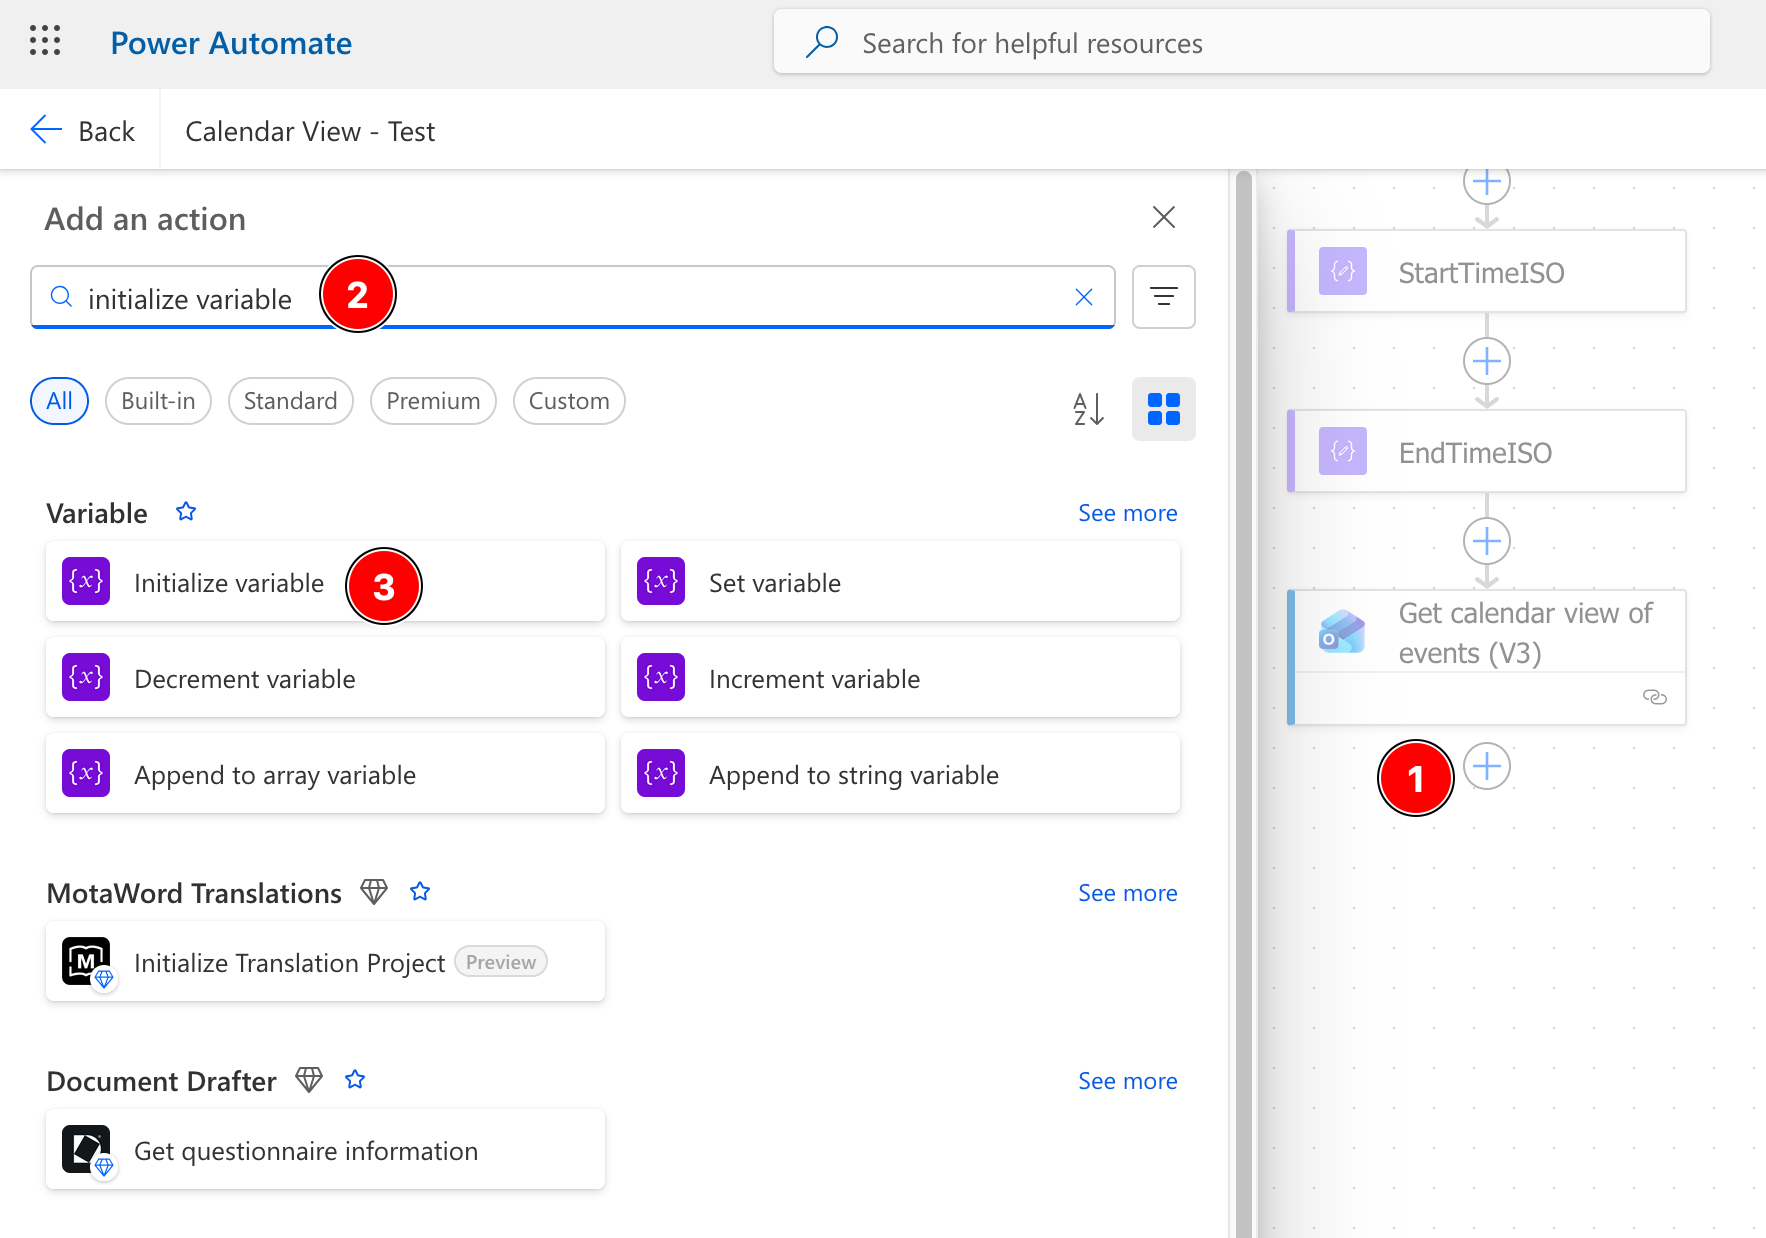
Step 4: Initialise an ICS File in a String Variable
Once I had the Outlook events, I needed somewhere to build the calendar file itself.
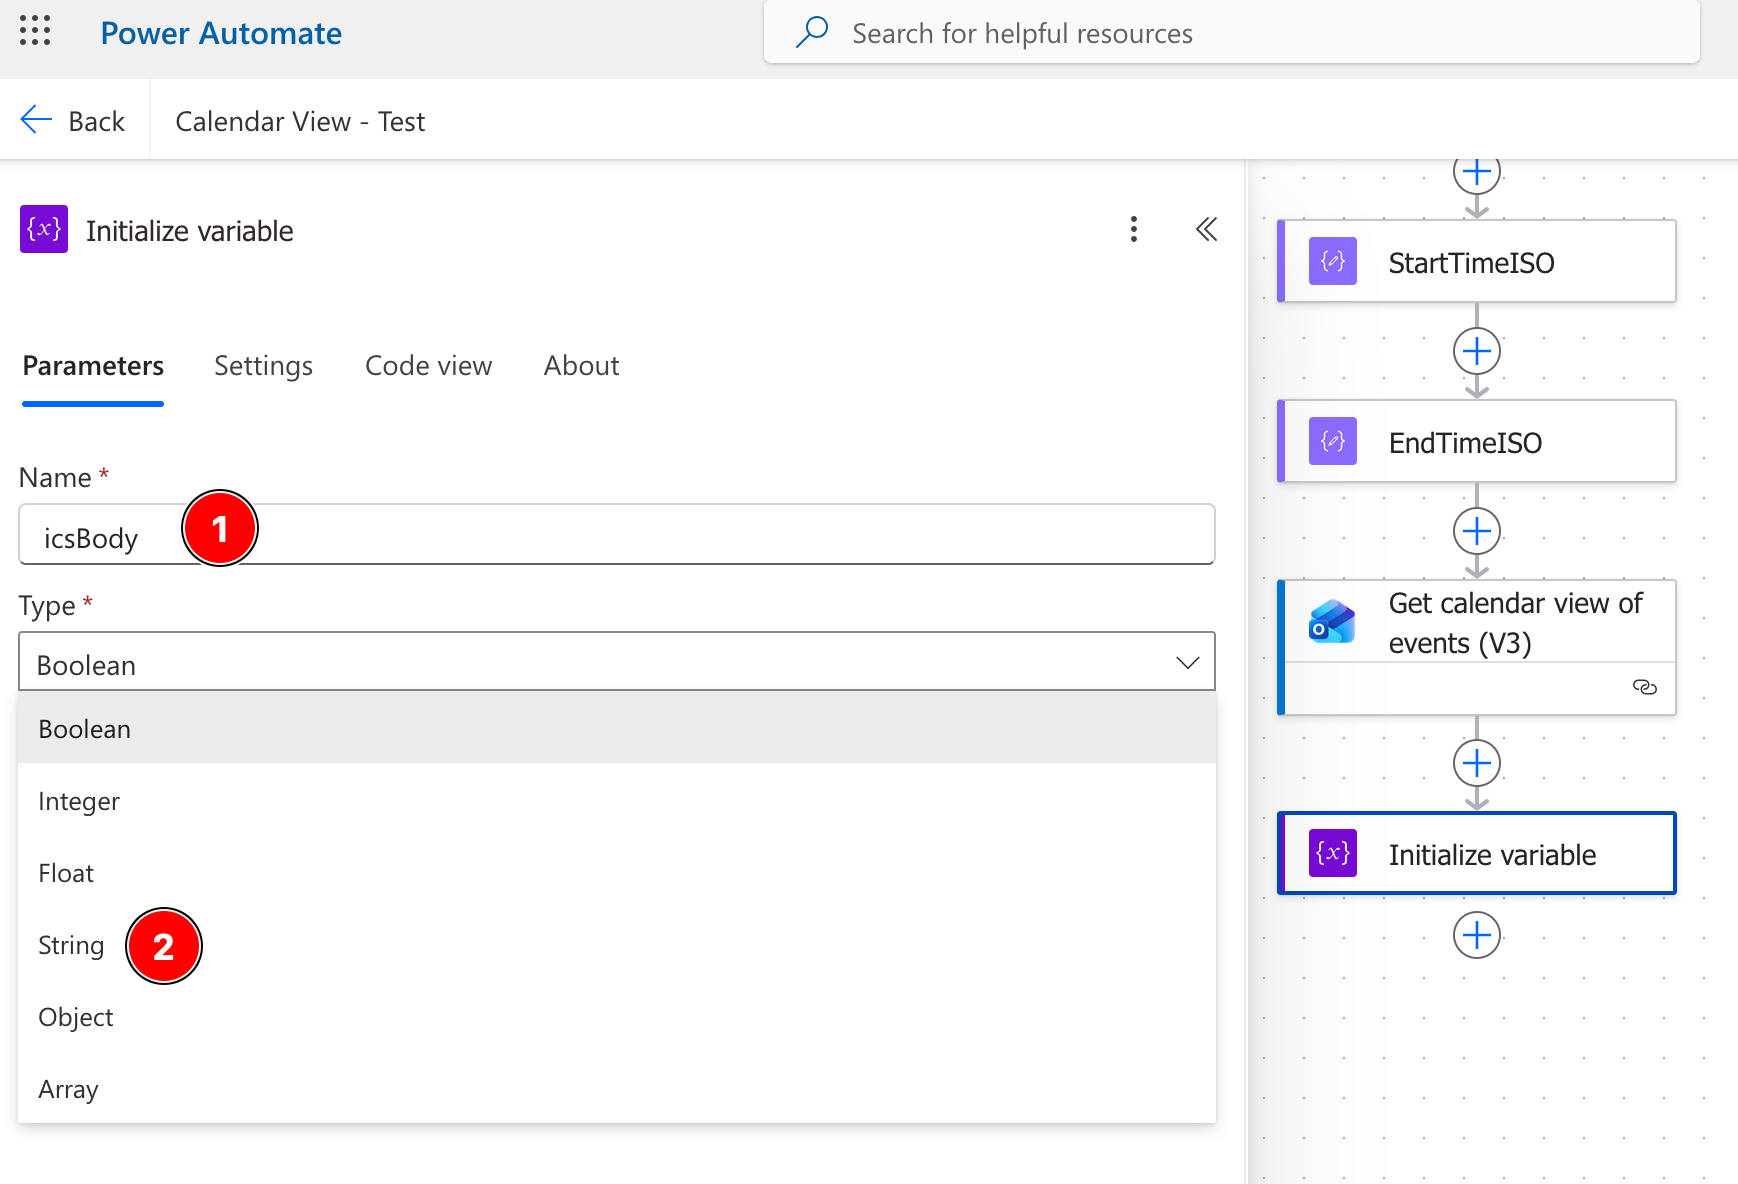
I added an Initialize variable action with these settings:
Name: icsBody
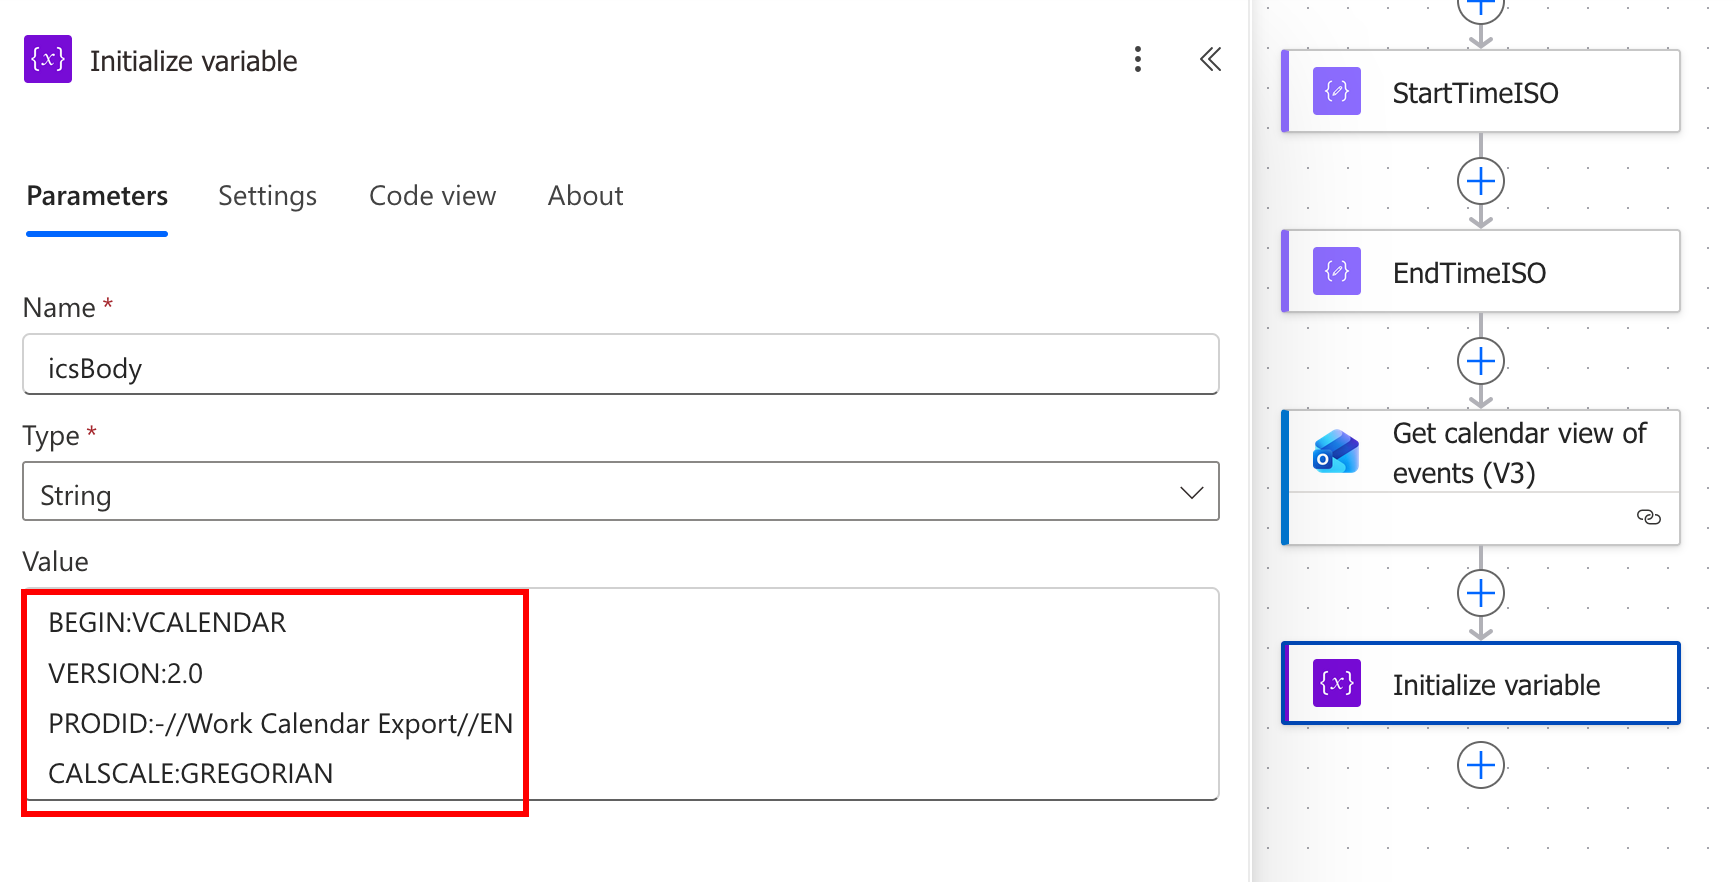
Type: String
I populated it with the opening lines of a valid ICS file:
BEGIN:VCALENDAR
VERSION:2.0
PRODID:-//Work Calendar Export//EN
CALSCALE:GREGORIAN
Step 5: Loop Through Each Calendar Event
The next step was to process each event returned from Outlook.
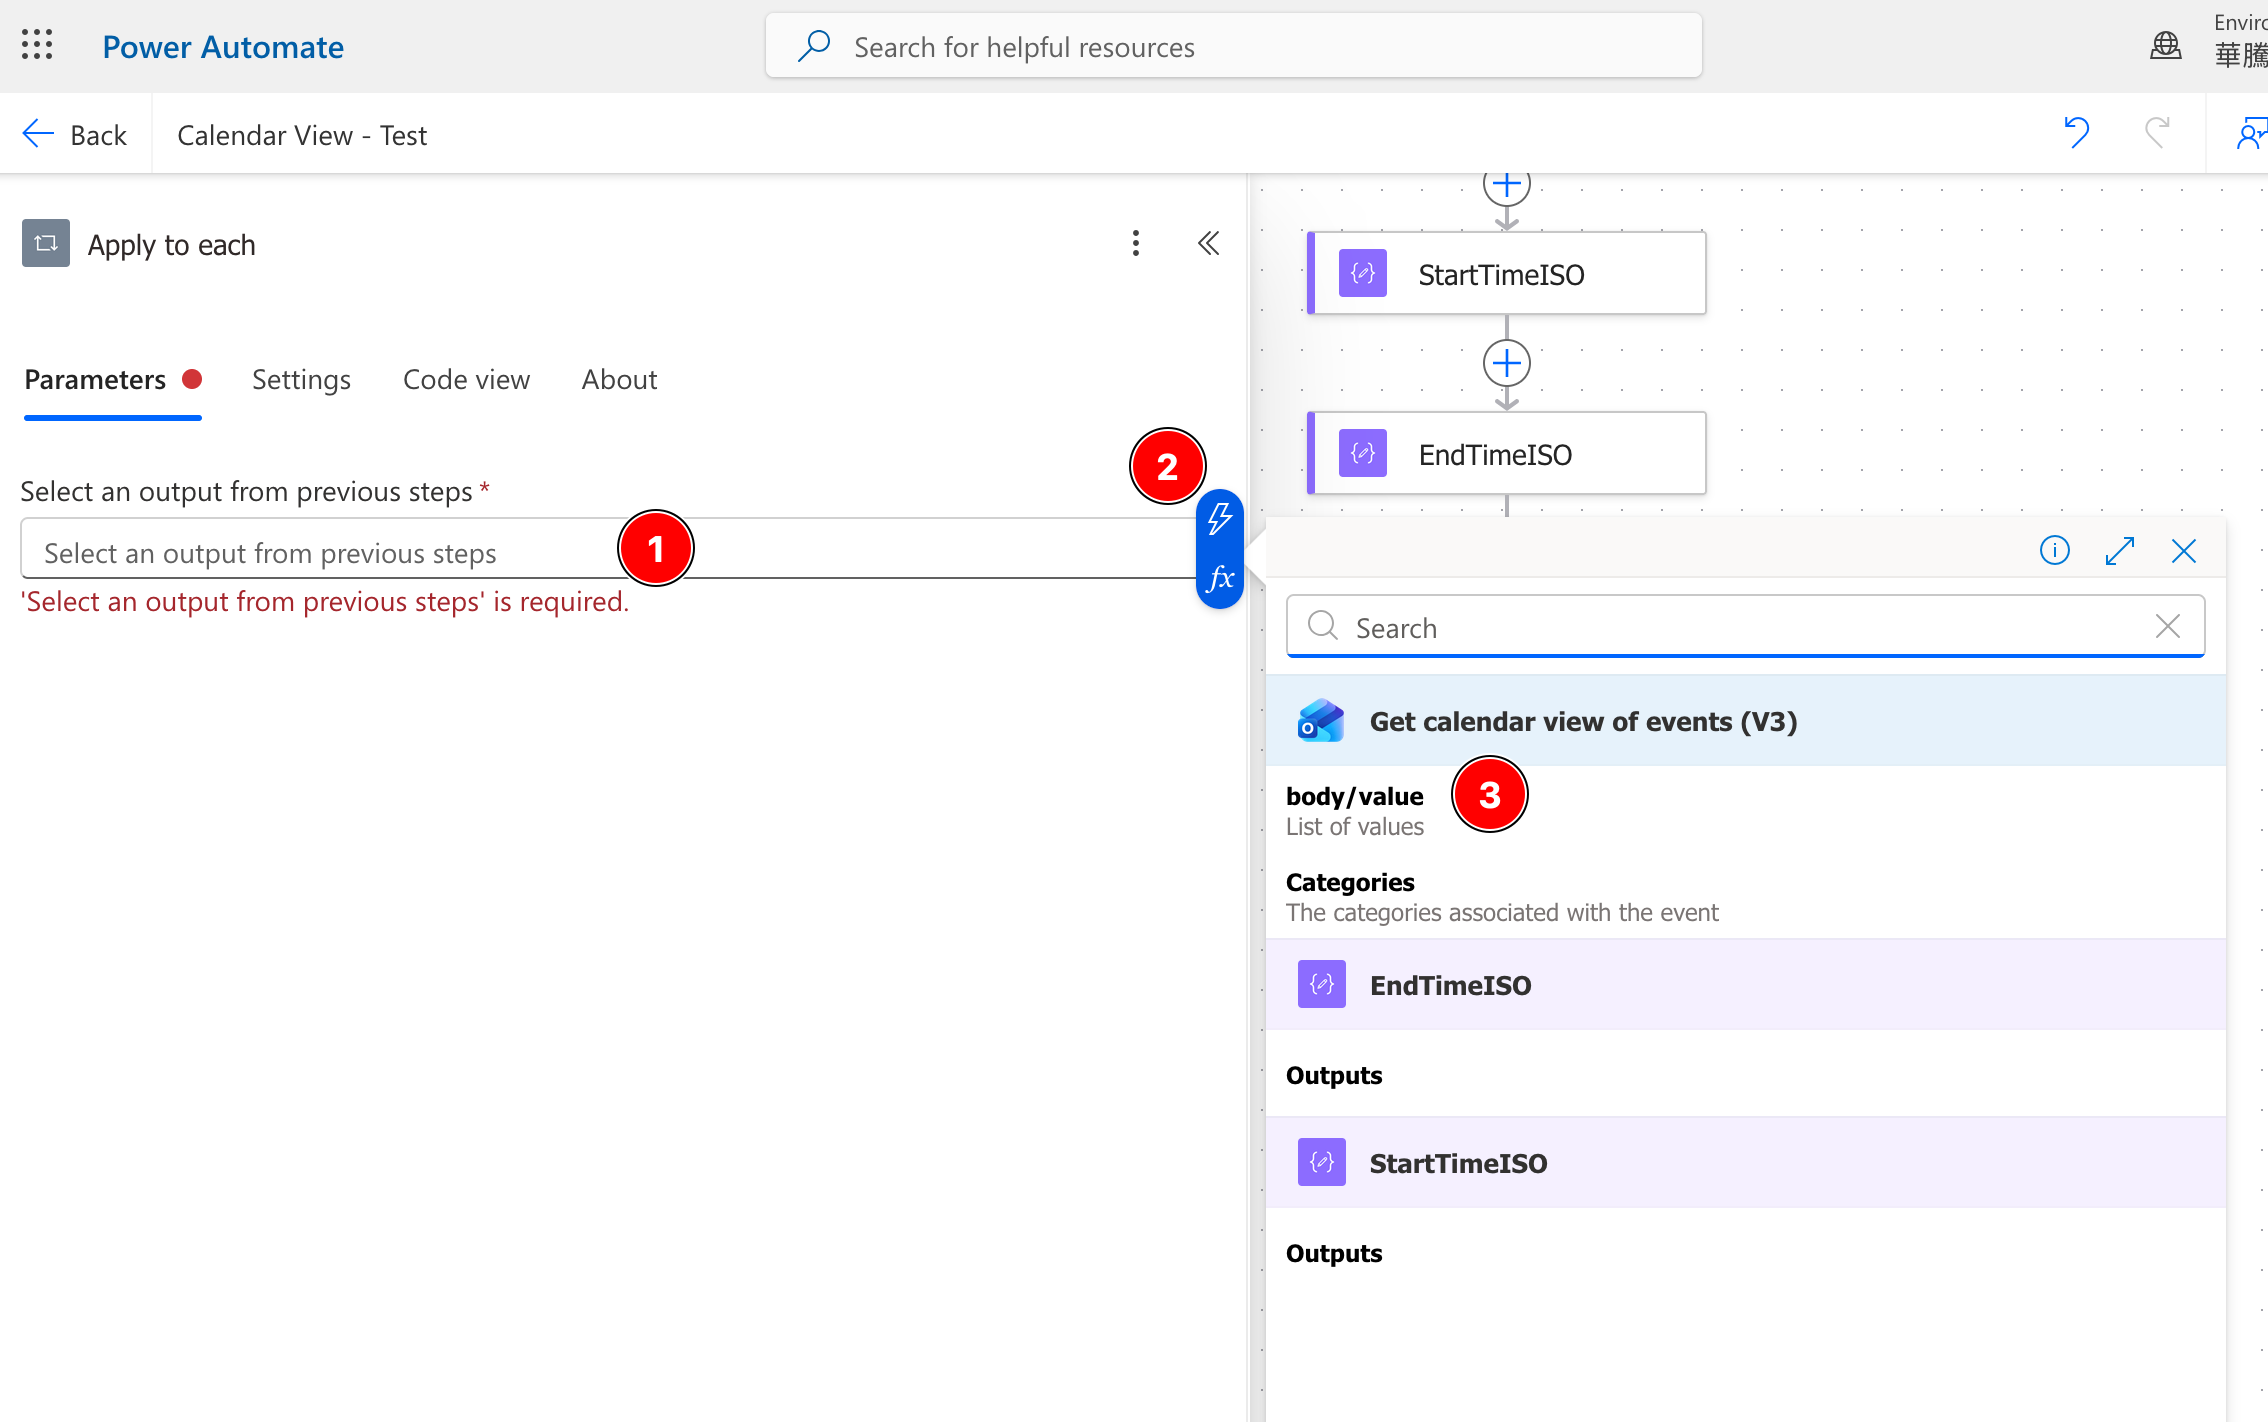
I added an Apply to each action
- Click inside the box and select “Data from previous step” and pointed it at the list of events returned from the
Get calendar view of events (V3)step.
If the visual picker does not show the list clearly, the expression looks like this:
body('Get_calendar_view_of_events_(V3)')?['value']

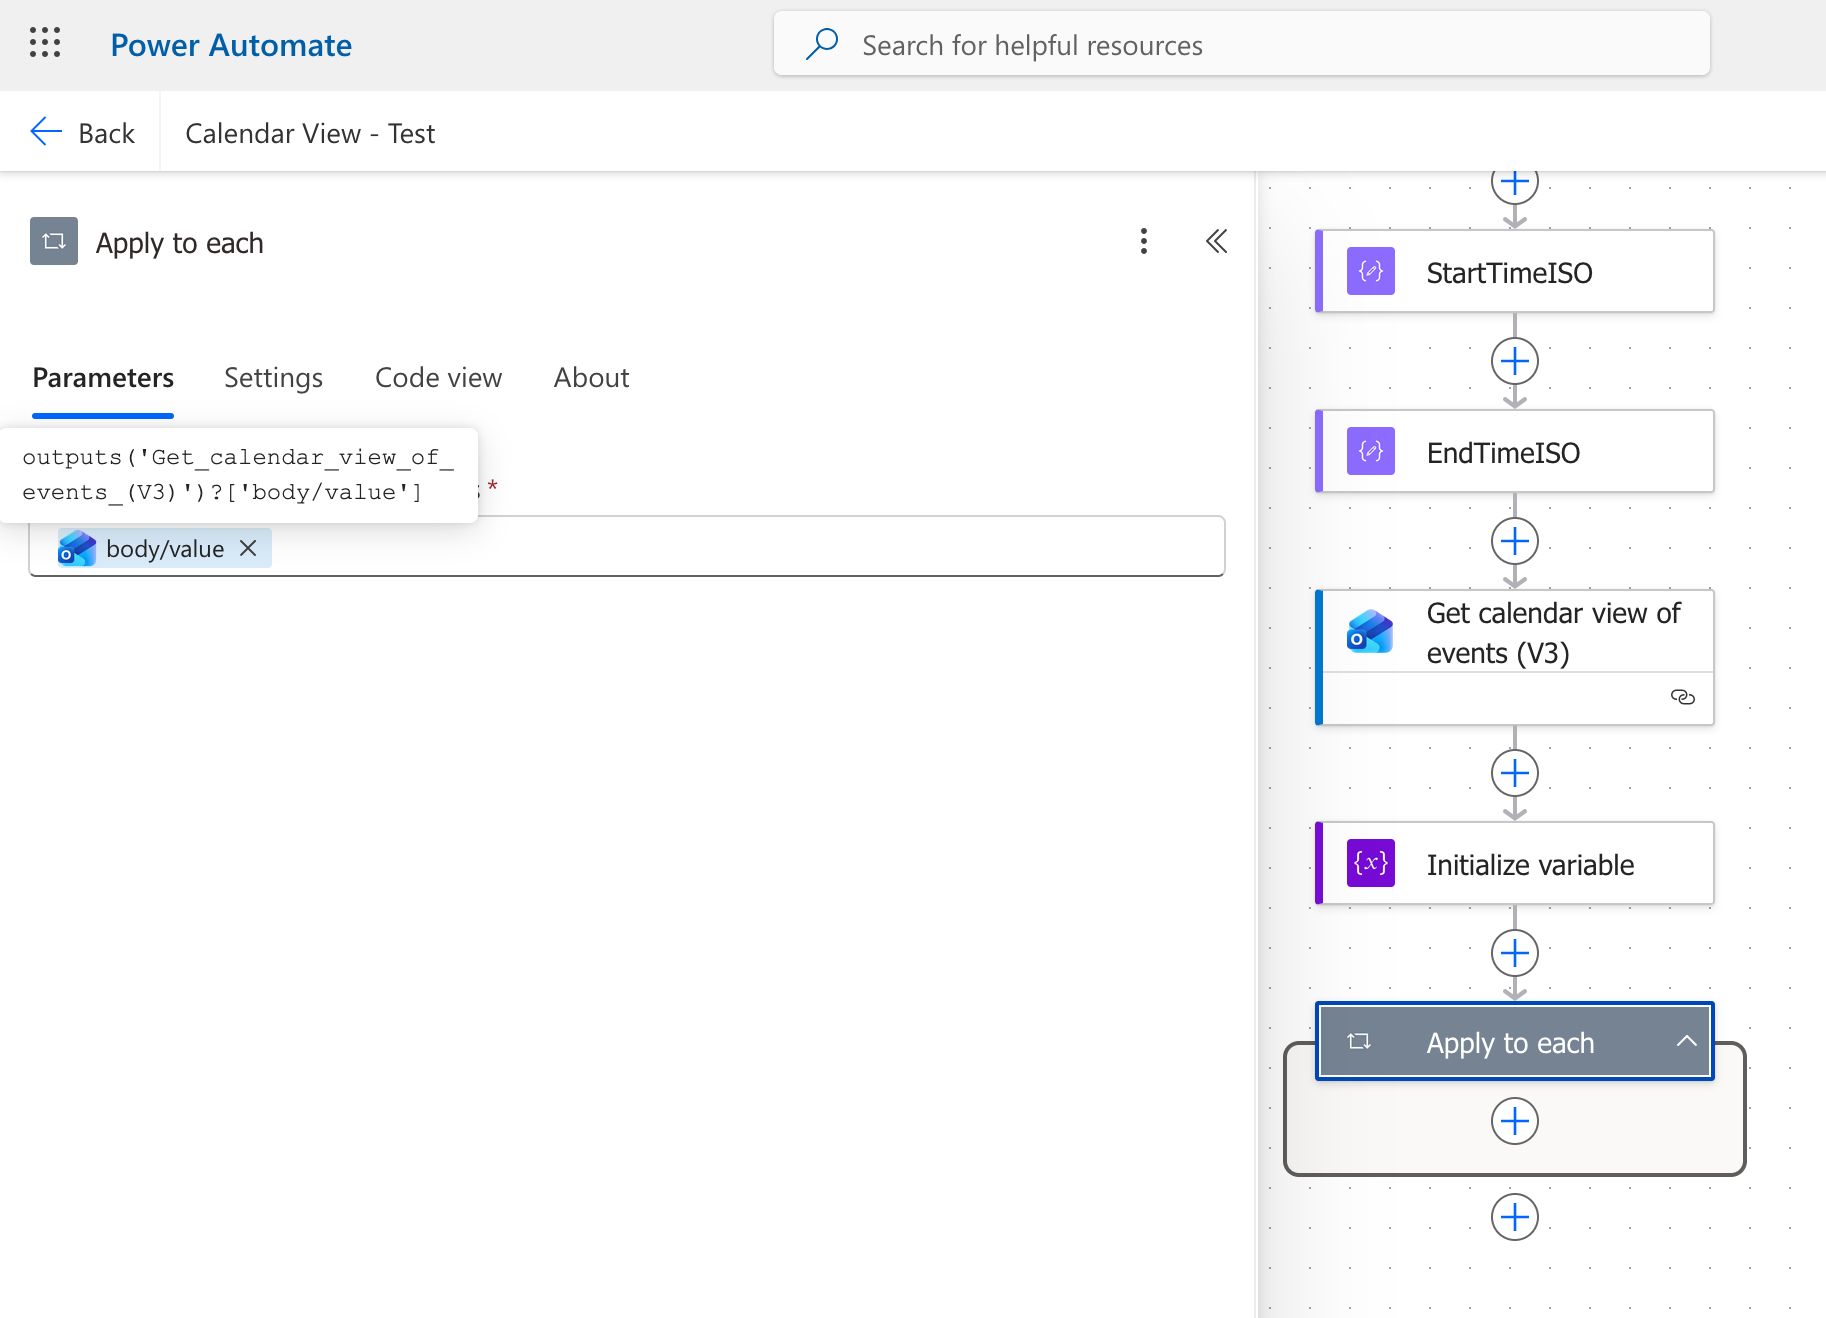
This tells Power Automate to iterate through the event collection one item at a time.
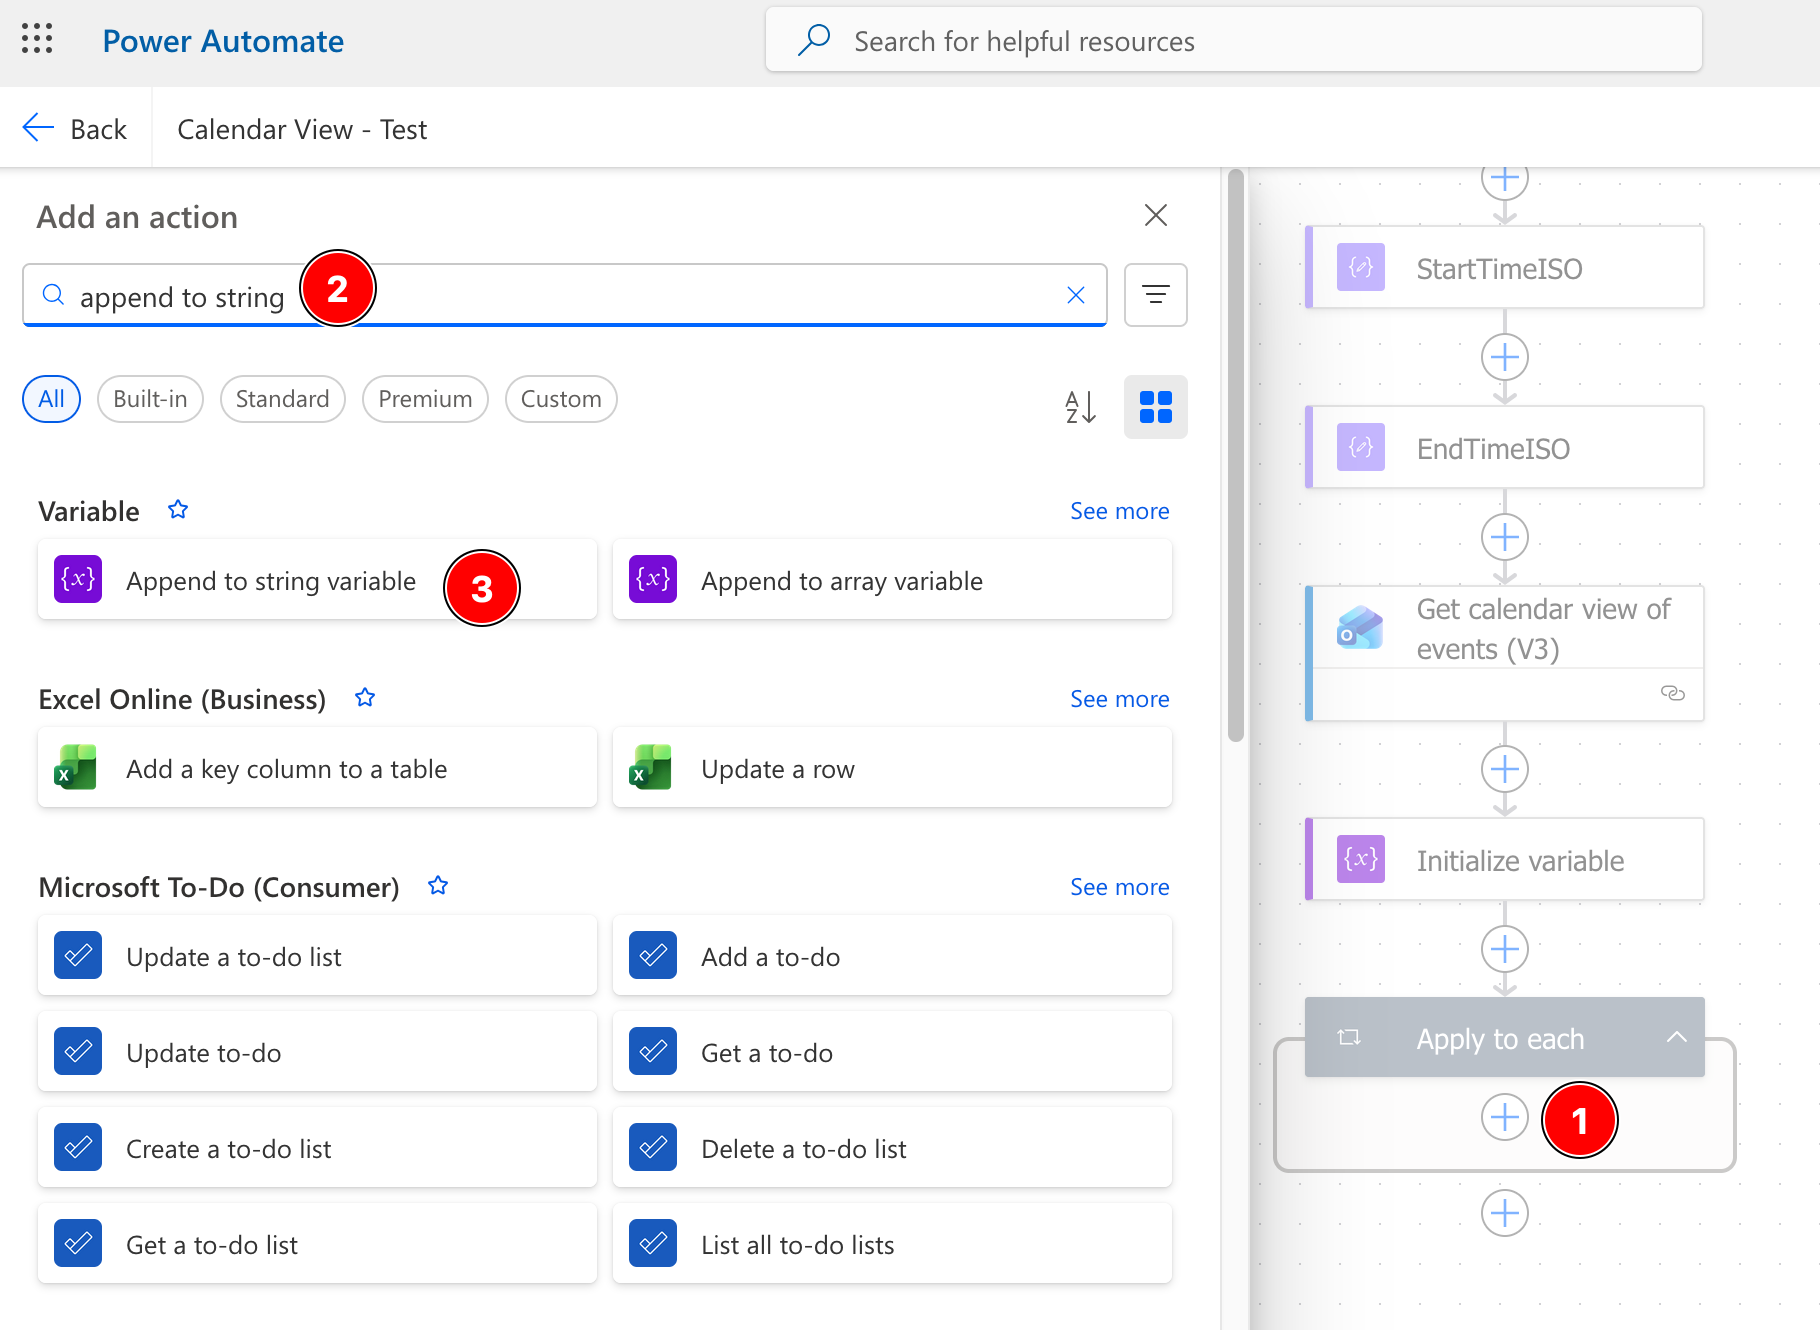
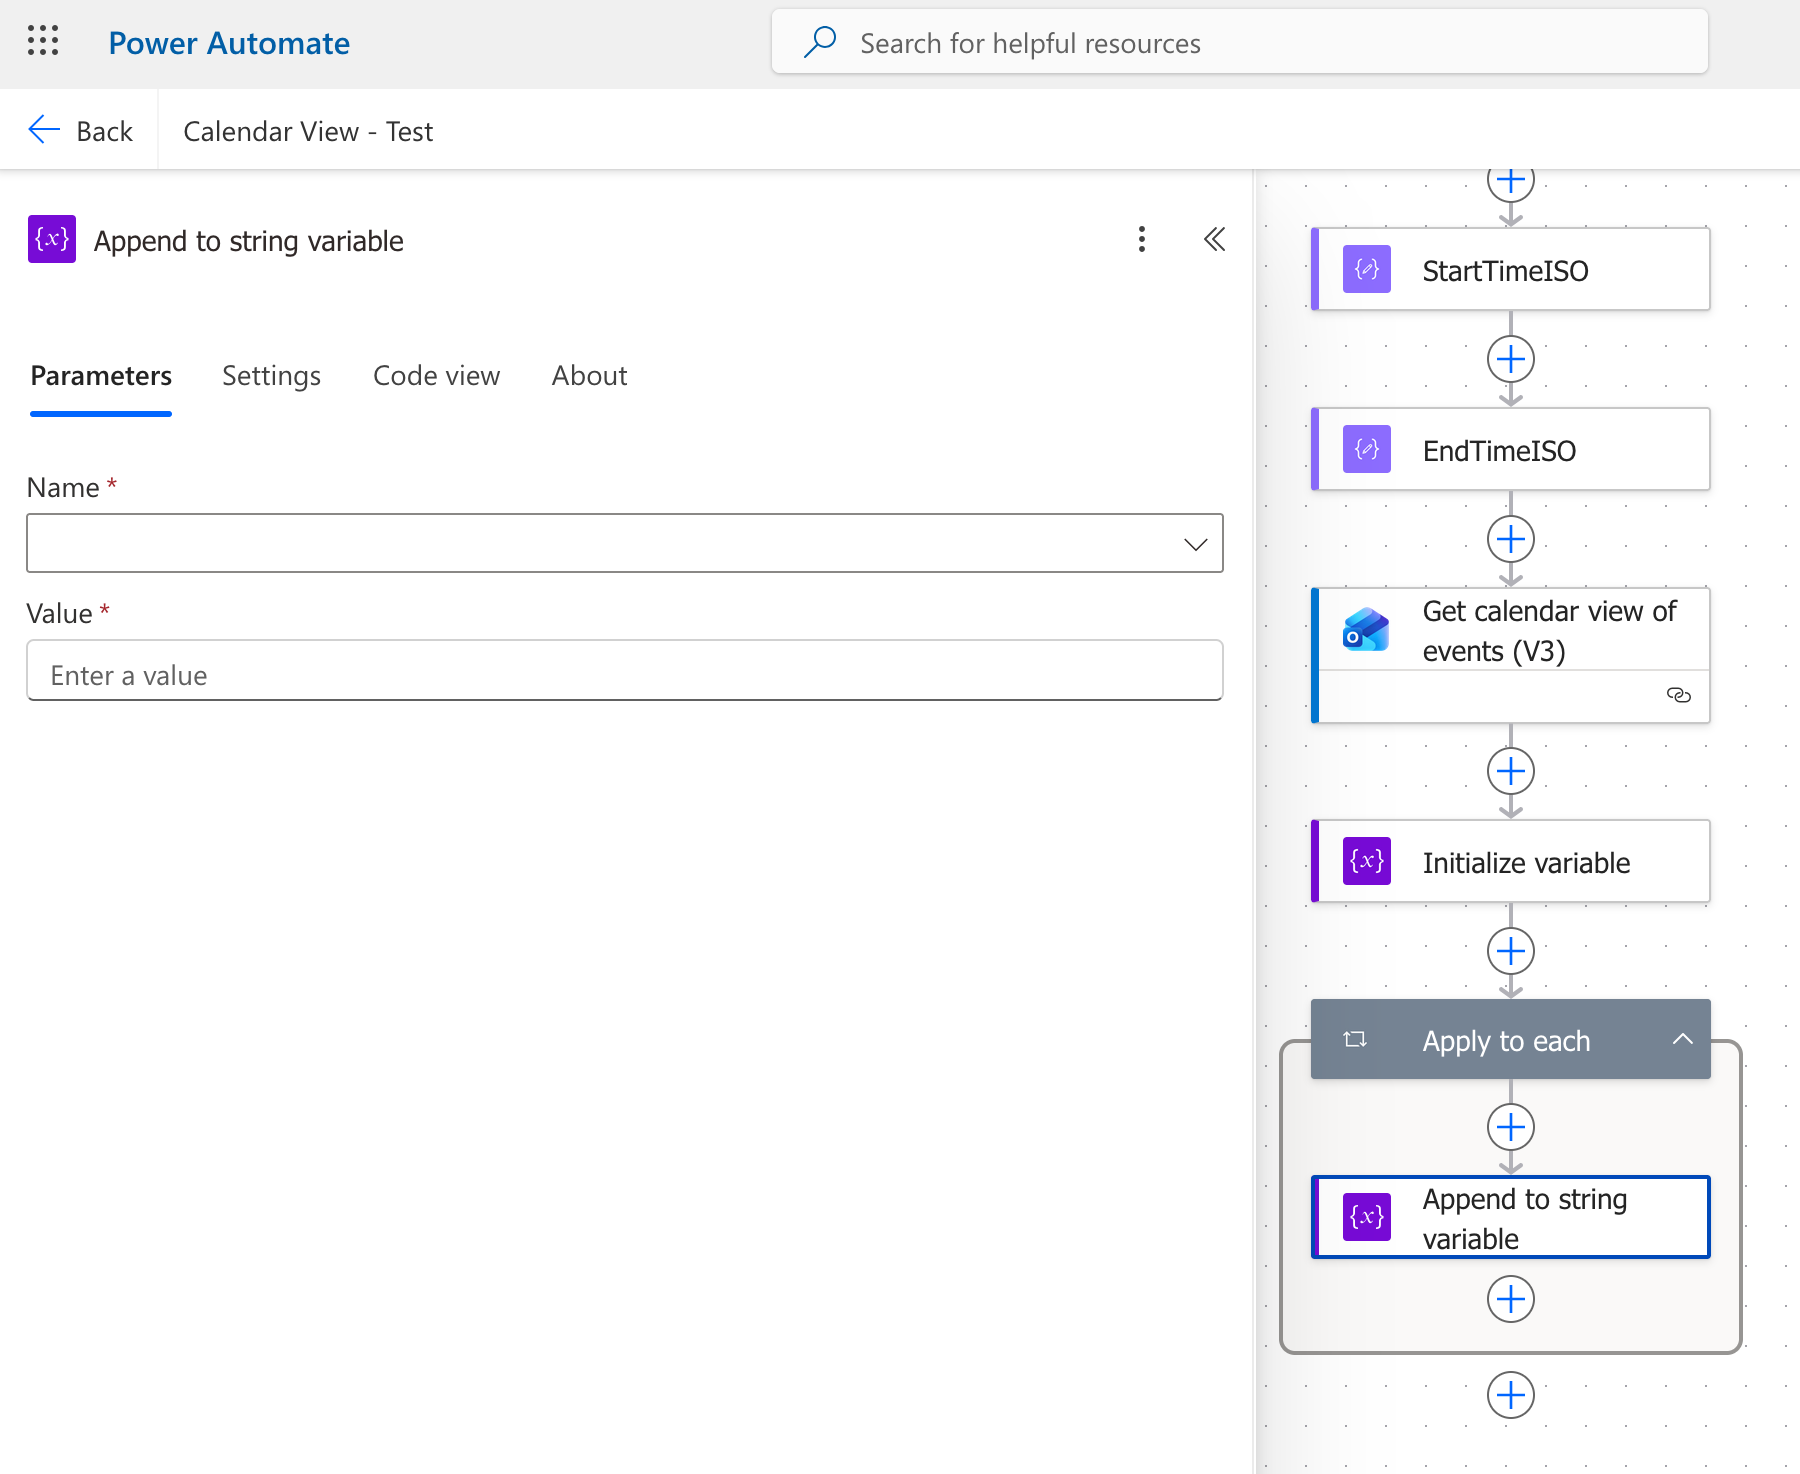
Step 6: Convert Each Meeting Into an ICS Event Block
Inside that loop, I added Append to string variable.
The variable name was icsBody, and the value I appended for each event looked like this:
This had an error
BEGIN:VEVENT
SUMMARY:@{items('Apply_to_each')?['subject']}
DTSTART:@{formatDateTime(items('Apply_to_each')?['start'], 'yyyyMMddTHHmmssZ')}
DTEND:@{formatDateTime(items('Apply_to_each')?['end'], 'yyyyMMddTHHmmssZ')}
END:VEVENT
Try this instead:
BEGIN:VEVENT
UID:evt-@{formatDateTime(items('Apply_to_each')?['start'],'yyyyMMddTHHmmss')}-@{substring(items('Apply_to_each')?['id'],sub(length(items('Apply_to_each')?['id']),16),16)}@atpcal
DTSTAMP:@{formatDateTime(utcNow(),'yyyyMMddTHHmmssZ')}
SUMMARY:@{replace(replace(replace(items('Apply_to_each')?['subject'],'\','\\'),',','\,'),';','\;')}
DTSTART:@{formatDateTime(items('Apply_to_each')?['start'],'yyyyMMddTHHmmssZ')}
DTEND:@{formatDateTime(items('Apply_to_each')?['end'],'yyyyMMddTHHmmssZ')}
END:VEVENT
NOTE If you want to rename every Calendar Entry to “Meeting” to anonymize the titles, just replace the SUMMARY:xxx line to SUMMARY:Meeting. Everything else can remain the same. In a future revision, I may consider leveraging Outlook’s built in sensitivity labels as a filter ie. normal, personal, private, & confidential.
BEGIN:VEVENT
UID:evt-@{formatDateTime(items('Apply_to_each')?['start'],'yyyyMMddTHHmmss')}-@{substring(items('Apply_to_each')?['id'],sub(length(items('Apply_to_each')?['id']),16),16)}@atpcal
DTSTAMP:@{formatDateTime(utcNow(),'yyyyMMddTHHmmssZ')}
SUMMARY:Meeting
DTSTART:@{formatDateTime(items('Apply_to_each')?['start'],'yyyyMMddTHHmmssZ')}
DTEND:@{formatDateTime(items('Apply_to_each')?['end'],'yyyyMMddTHHmmssZ')}
END:VEVENT

A FEW NOTES ABOUT THIS CODE
UID(required). RFC 5545 requires every event to have a unique identifier. When a recurring series is expanded into many occurrences, calendar clients — Apple and Google especially — de-duplicate onUID. If every occurrence has the sameUIDor none at all, the client collapses them into a single event, and your daily/weekly instances quietly disappear. I build a unique value per occurrence from its start time plus the tail of its event id. I deliberately keep it short: the raw Outlook id is ~150 characters, which violates the 75-octet line-length rule, and strict parsers will fold or choke on it.DTSTAMP(required). Also mandatory under RFC 5545. Some clients reject events that omit it.SUMMARYescaping. Commas and semicolons are structural delimiters in ICS. An unescaped comma in a meeting title corrupts that line, and a strict parser will skip the whole event. The nestedreplace()escapes backslash, comma, and semicolon, in that order (backslash first, so you don’t double-escape what you just added).- The blank line after
END:VEVENT. I was running into “data isn’t valid.” errors when macOS tried to read the ICS file. We then discovered it required a trailing newline, otherwise theEND:VEVENTof one event runs straight into theBEGIN:VEVENTof the next — you getEND:VEVENTBEGIN:VEVENTon a single line, which is not a valid content line, and the entire feed fails to parse. A trailing newline on every block keeps them separated. A quick way to catch that last one — it’s invisible in a normal text editor but obvious with:
head -12 calendar.ics | cat -vte
cat -vte (the BSD/macOS equivalent of cat -A) shows line endings as $ and non-printing characters as M-…, so a merged END:VEVENTBEGIN:VEVENT jumps right out.
This was one of the most important parts of the setup.
It preserved:
- The exact meeting title from Outlook
- The start time
- The end time
It did not include:
- Attendees
- Body text
- Meeting notes
- Teams links
- Locations
That gave me a useful but narrow view of my schedule.
A subtle but important point here is that the V3 connector returns start and end directly as strings. I originally tried to reference start.dateTime, which failed. The correct form in this case was just start and end.
Step 7: Close the ICS File
After the loop finished, I added one more Append to string variable action outside the loop.
That action appended:
END:VCALENDAR
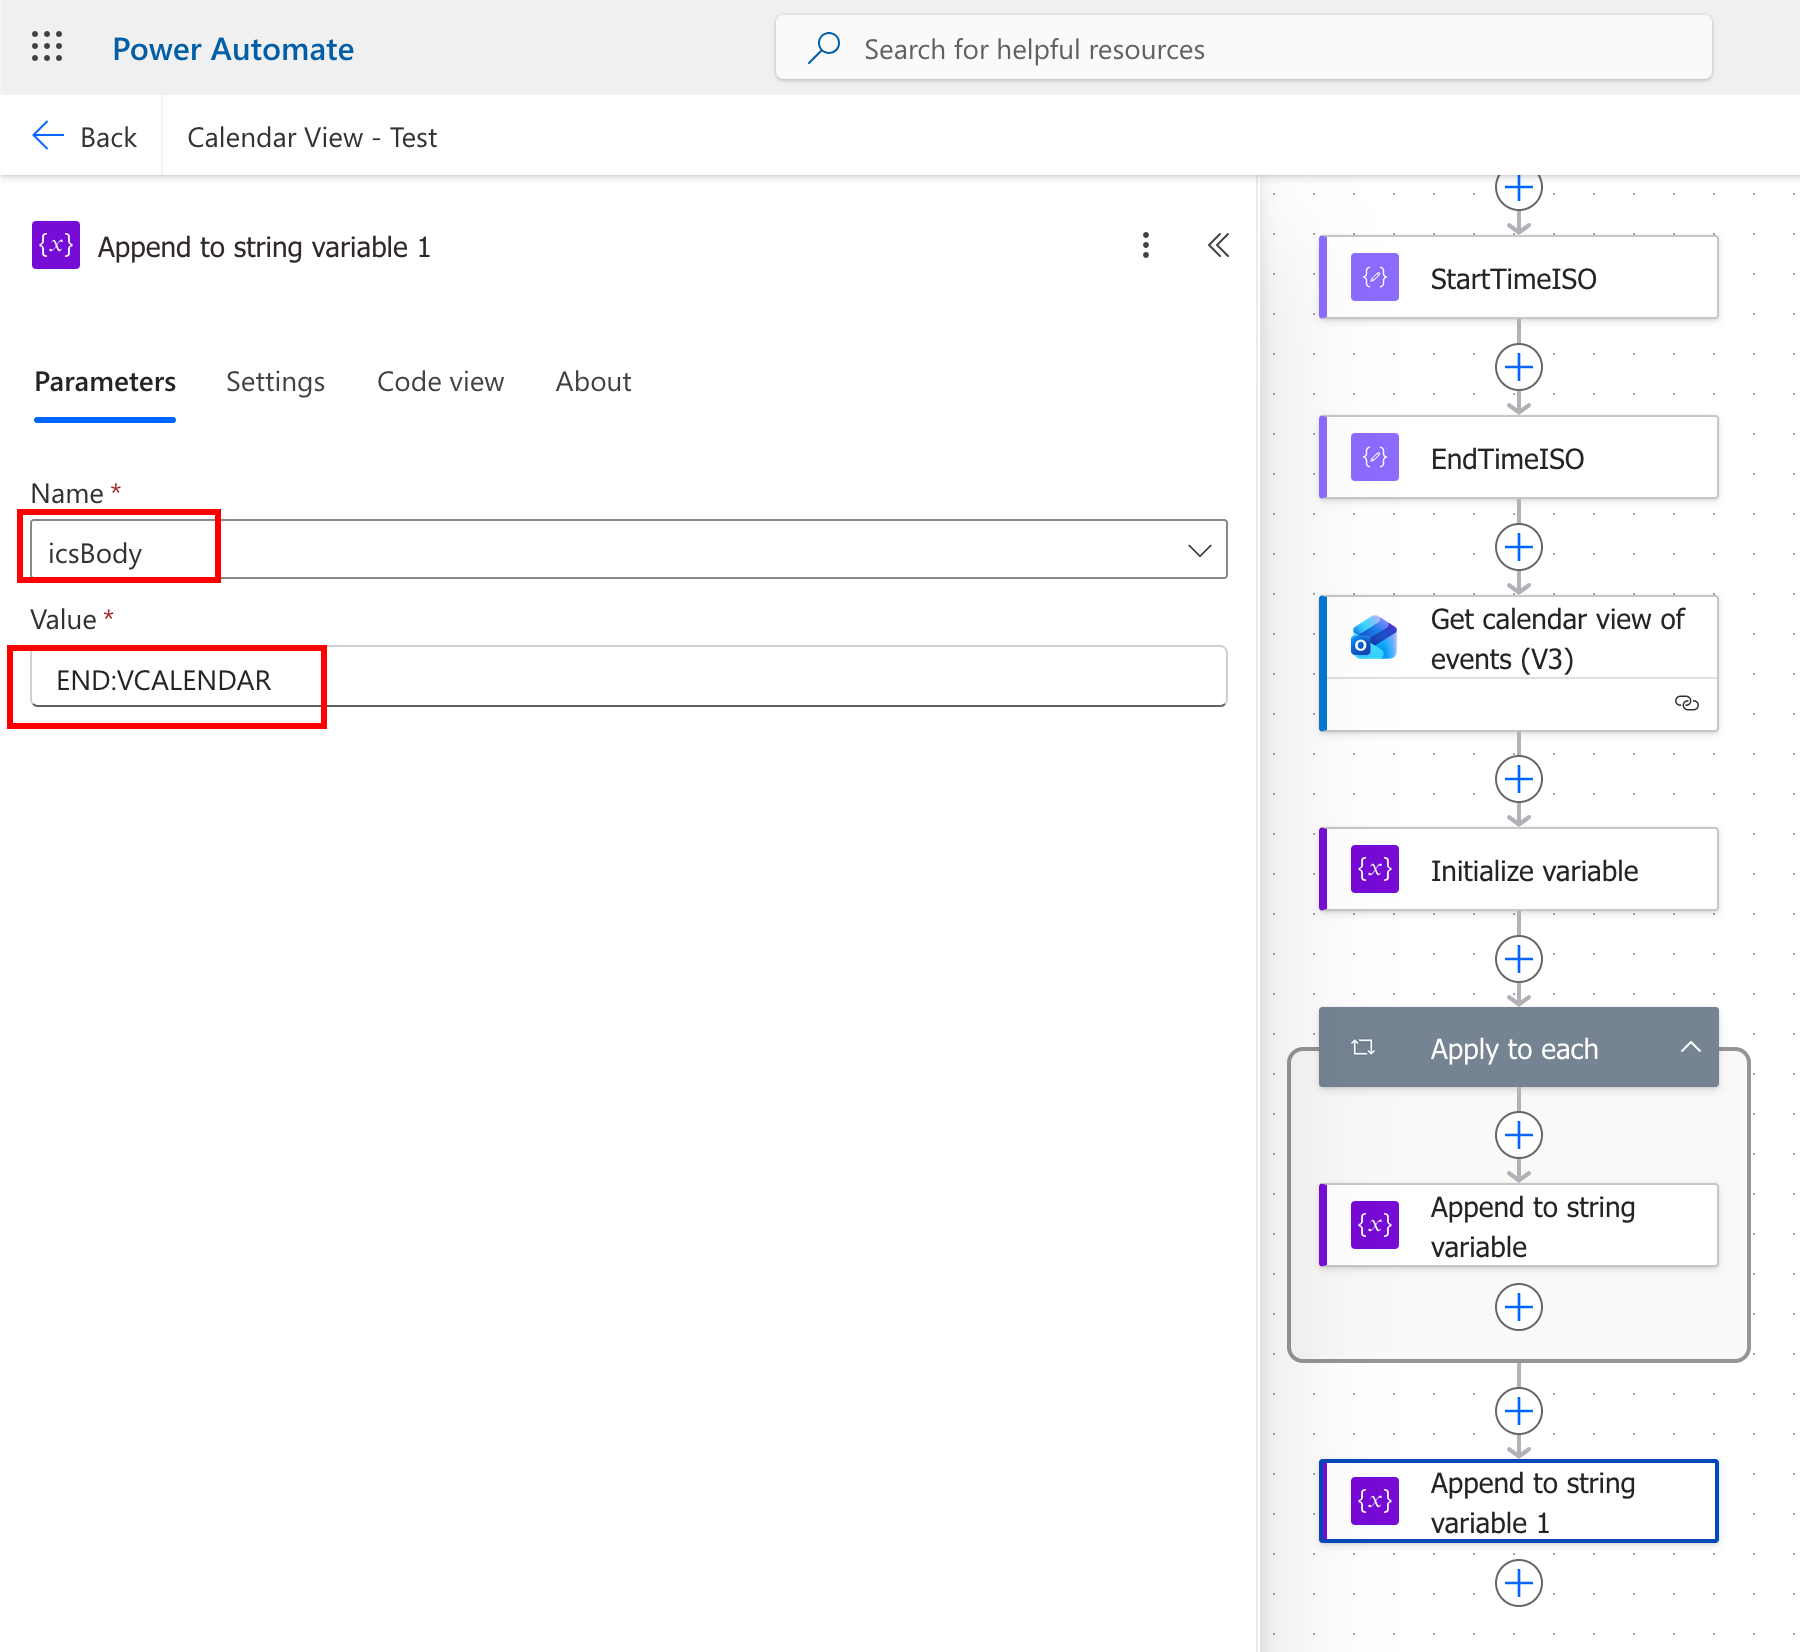
At that point, the icsBody variable contained a valid, fully assembled ICS calendar file.
Step 8: Save the ICS File to Dropbox
The next question was where to store the file so Apple Calendar could subscribe to it reliably.
I first tried OneDrive, both business and personal, and later considered iCloud. Those approaches either failed with connection errors or did not provide a clean direct file endpoint.
Dropbox turned out to be the right answer.
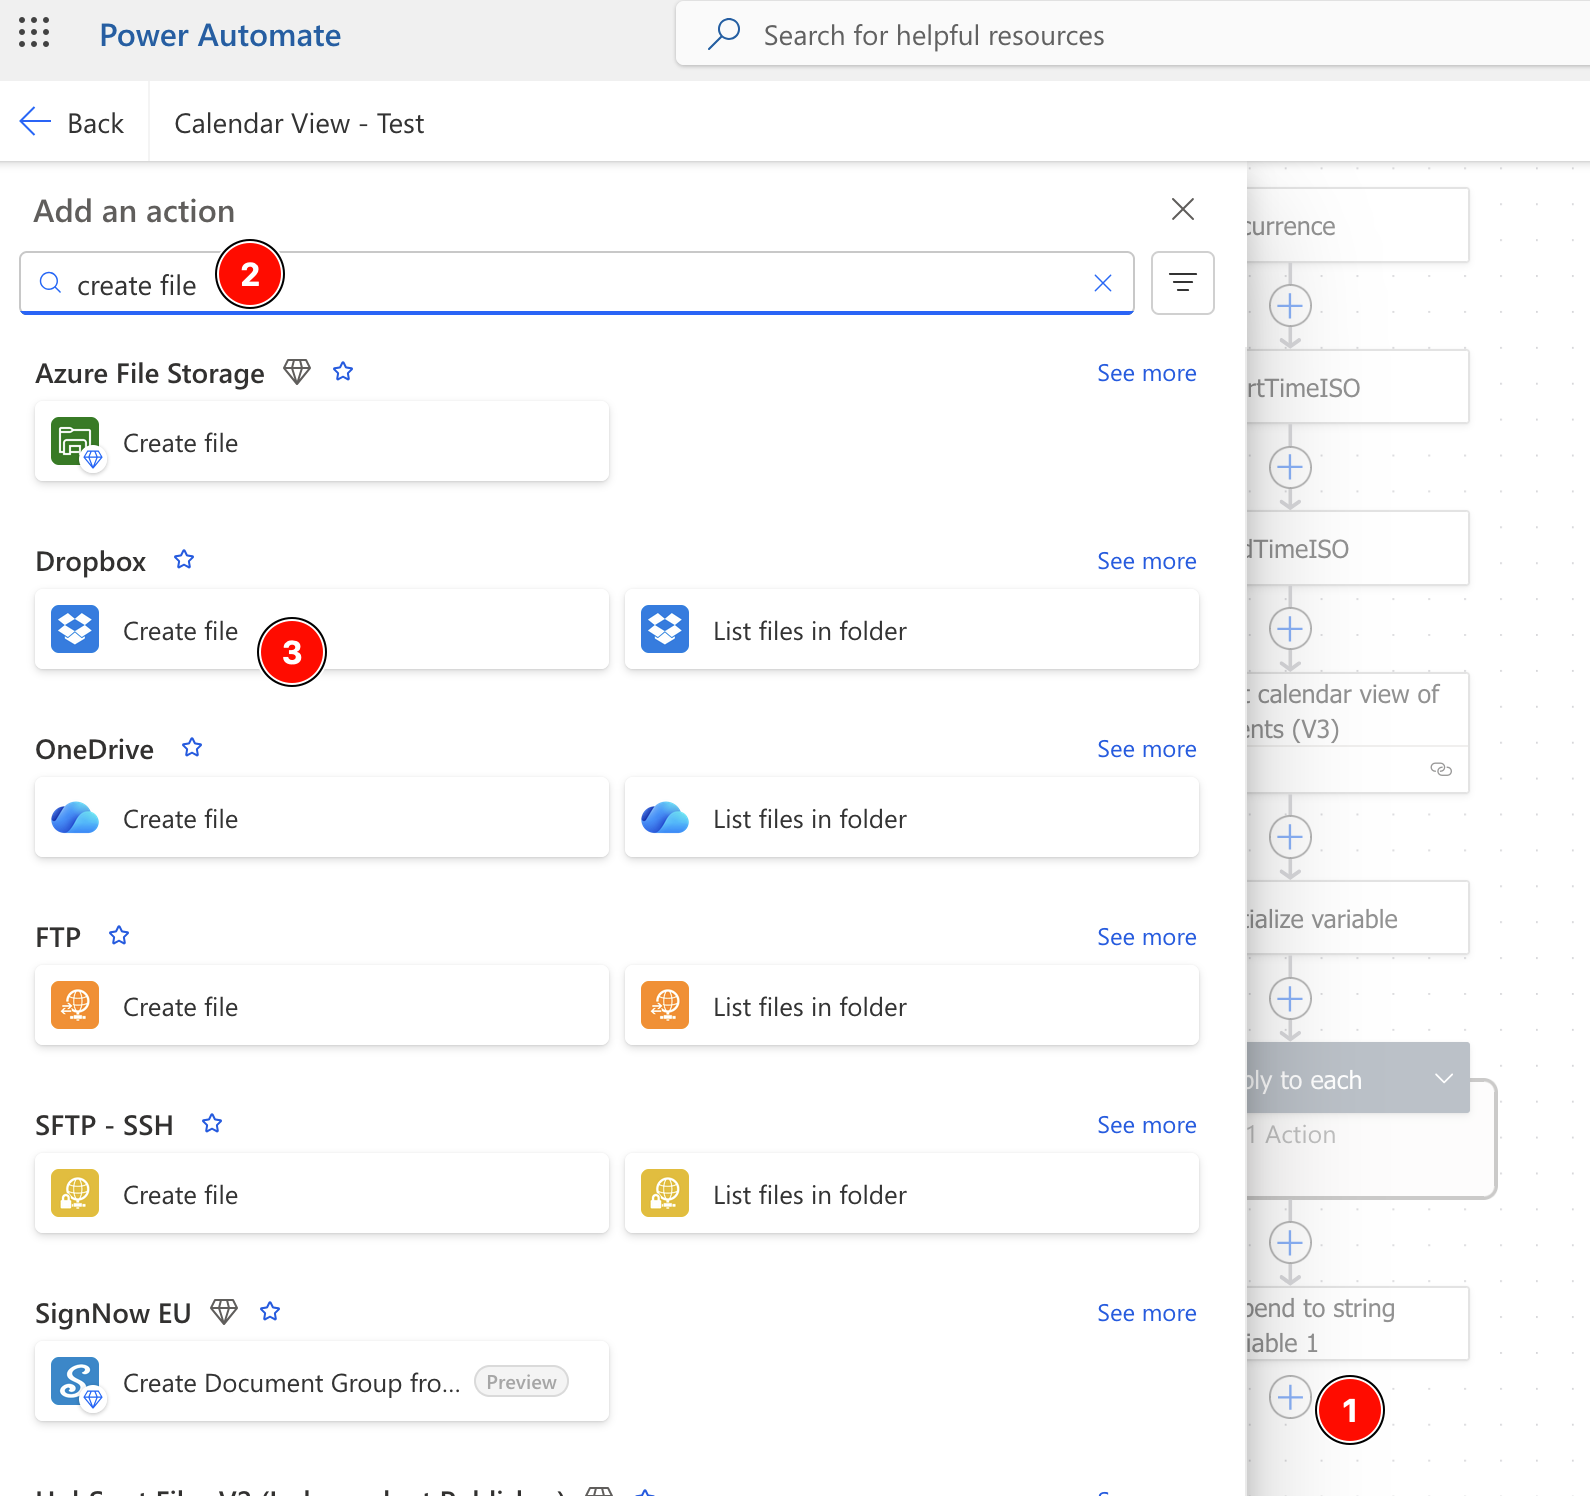
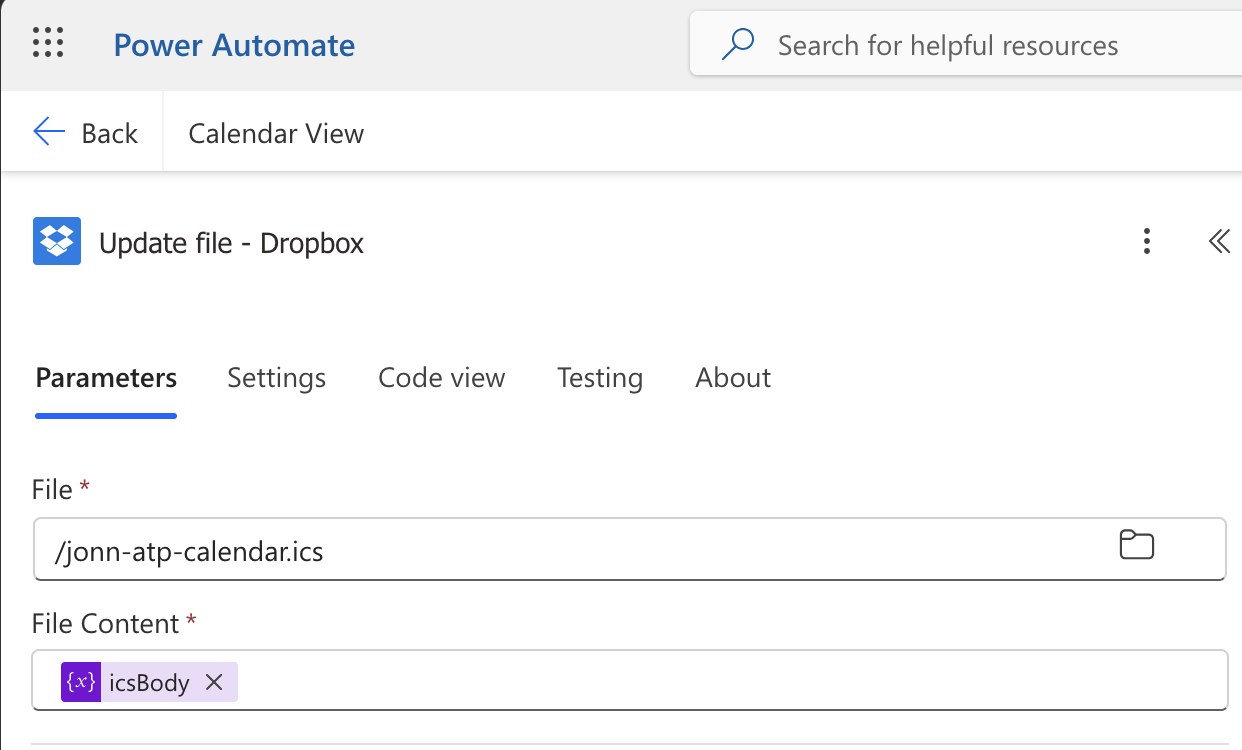
I added a Dropbox action. Be sure to select the correct option that corresponds to Dropbox (see screen pic below). During the process might ask you for authentication credentials after which it will maintain access persistence with an OAuth token. Very cool.
Create file
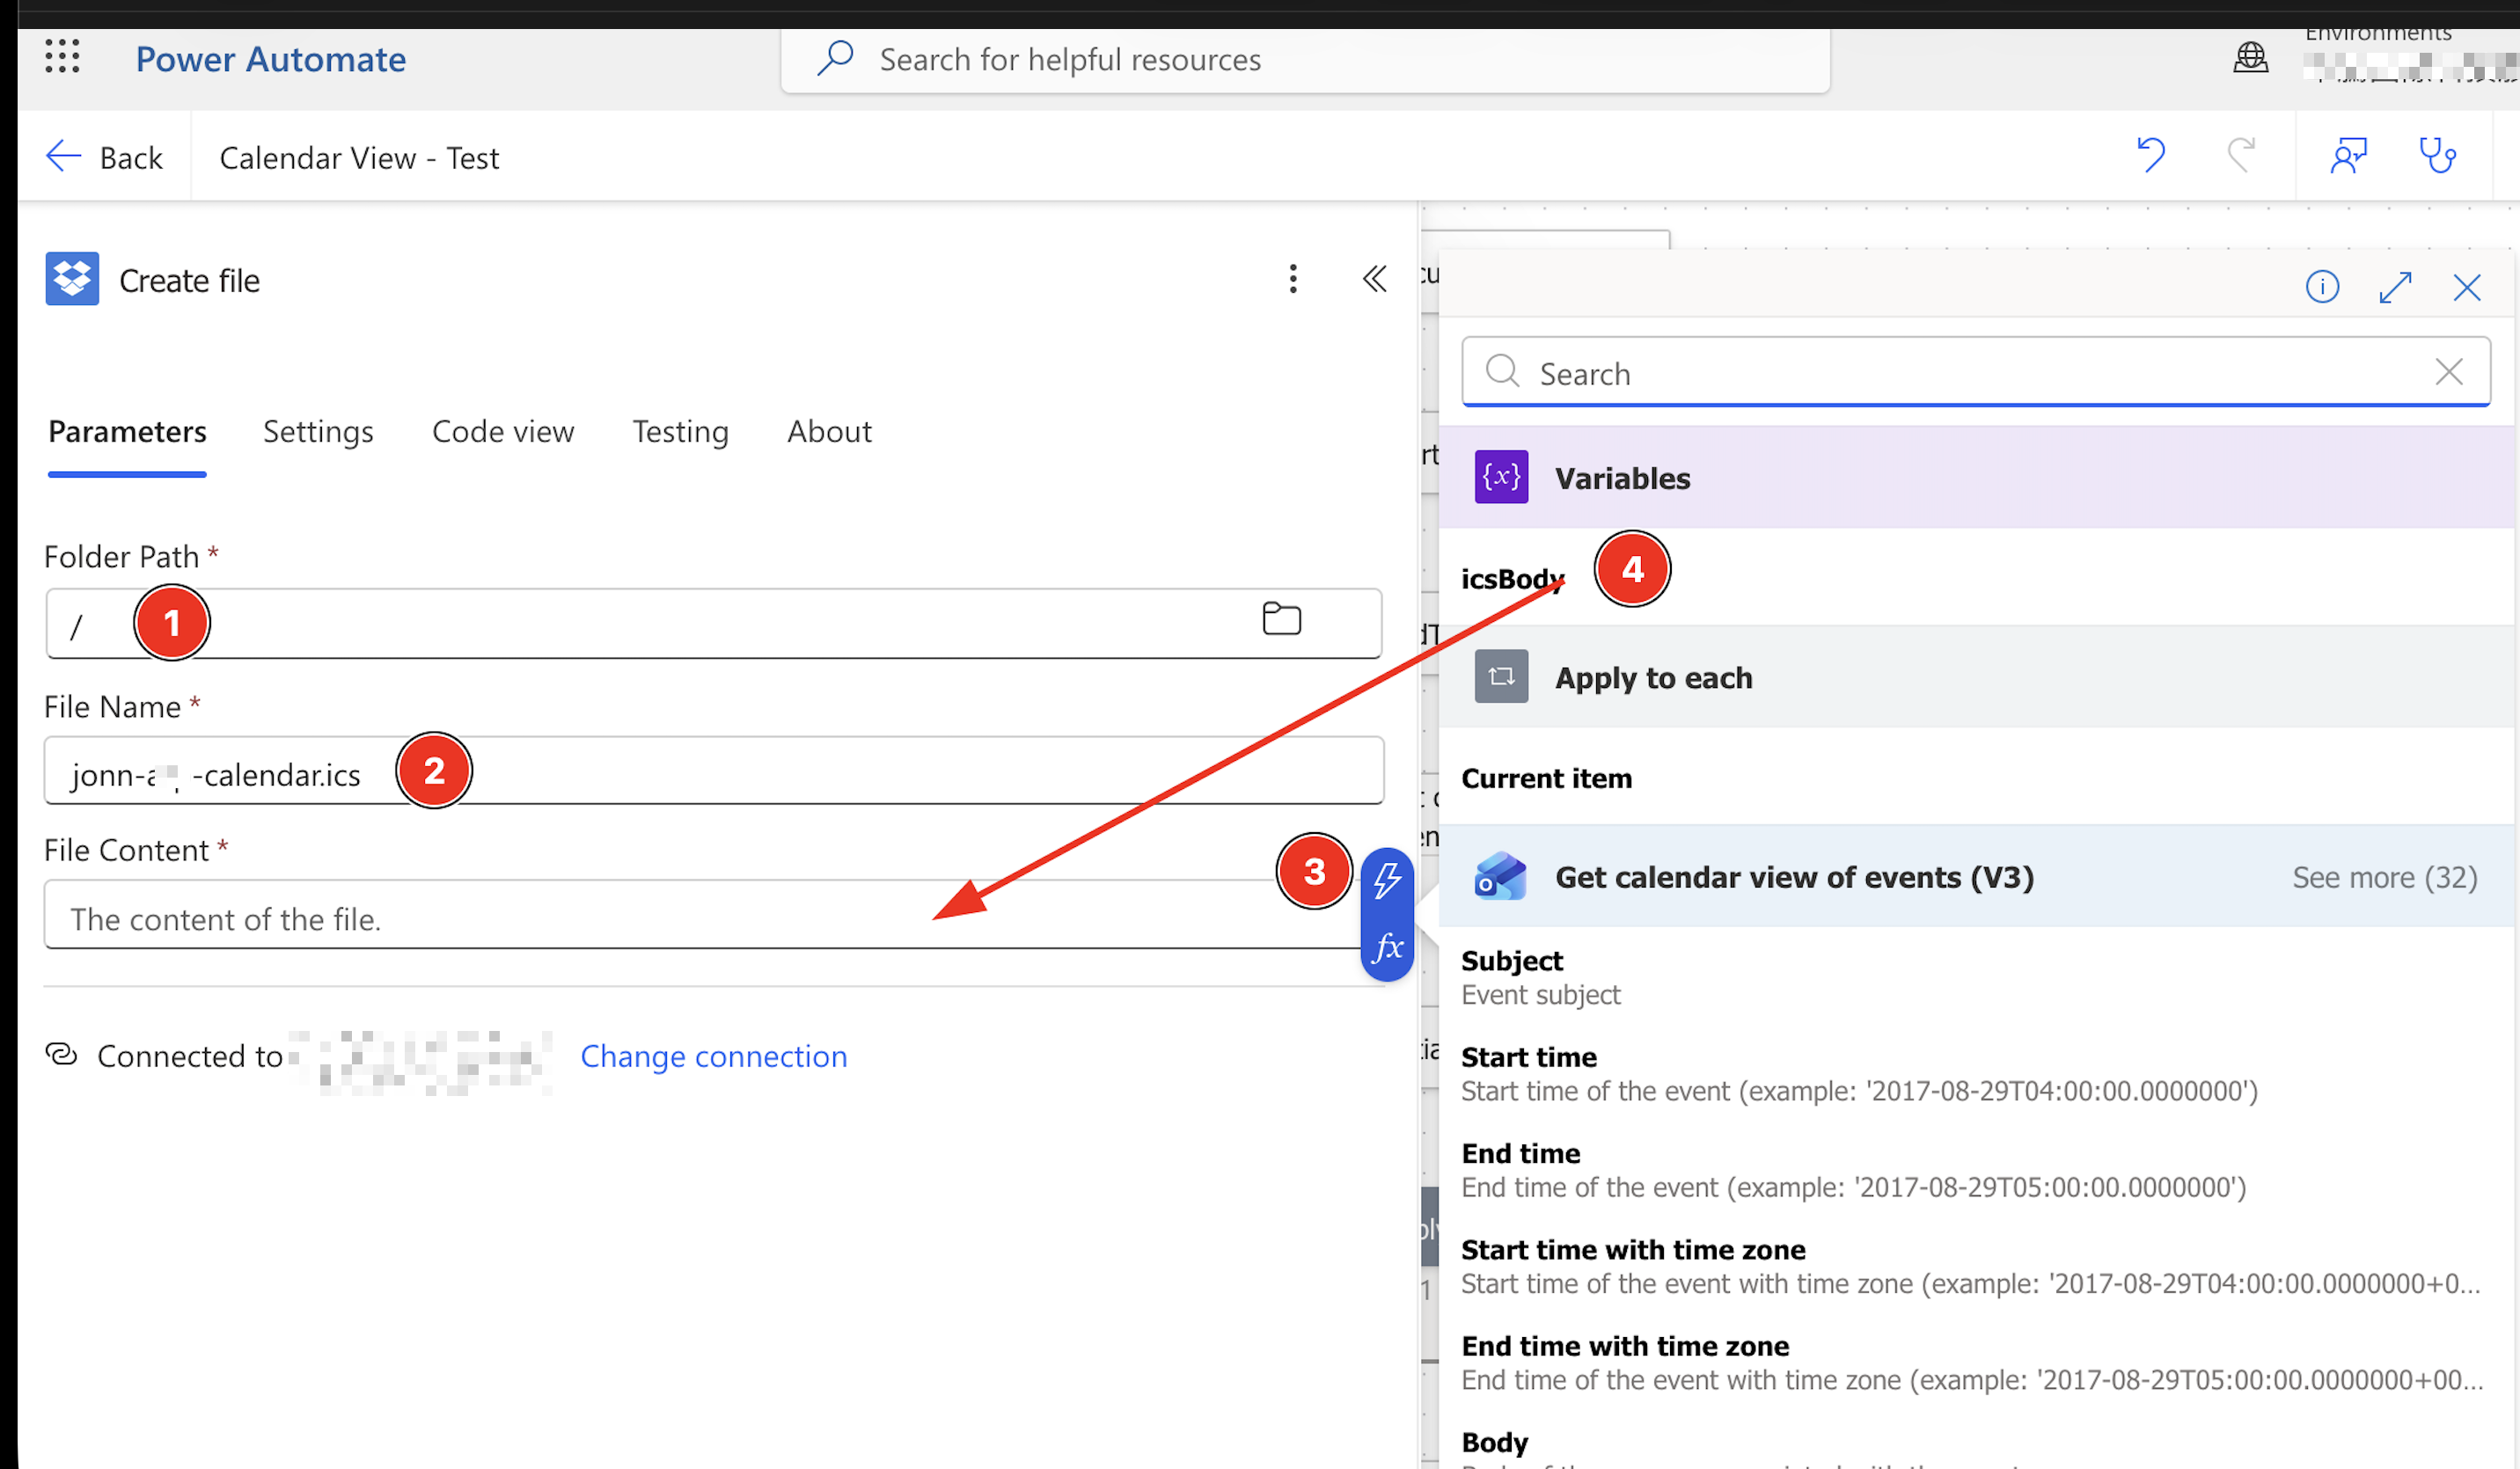
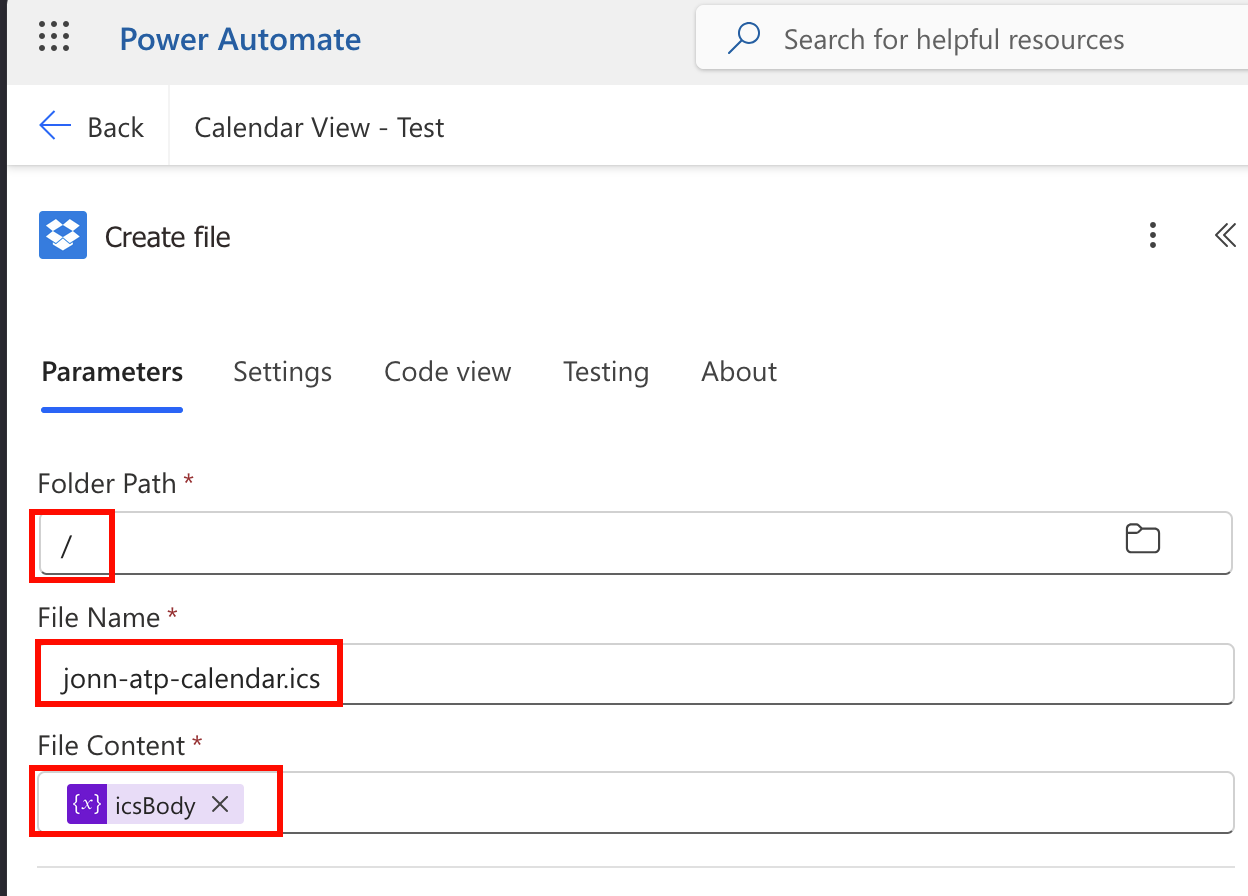
I set the file name to:
jonn-atp-calendar.ics
and used icsBody as the file content.
Initially, I expected Dropbox might refuse to overwrite an existing file, so I explored delete-and-recreate logic. However, when I tested the flow, I found that the connector in my setup created the file successfully on the first run and then updated it successfully on the second run without any extra overwrite handling.
That simplified the final design considerably.
Step 9: Verify That the Flow Updates the Dropbox File
After adding the Dropbox action, I saved and ran the flow manually. The first run created the file successfully. I then ran it a second time to see whether it would update or fail. It updated successfully, which confirmed that the Dropbox step was good enough as-is. That made the final flow much cleaner.
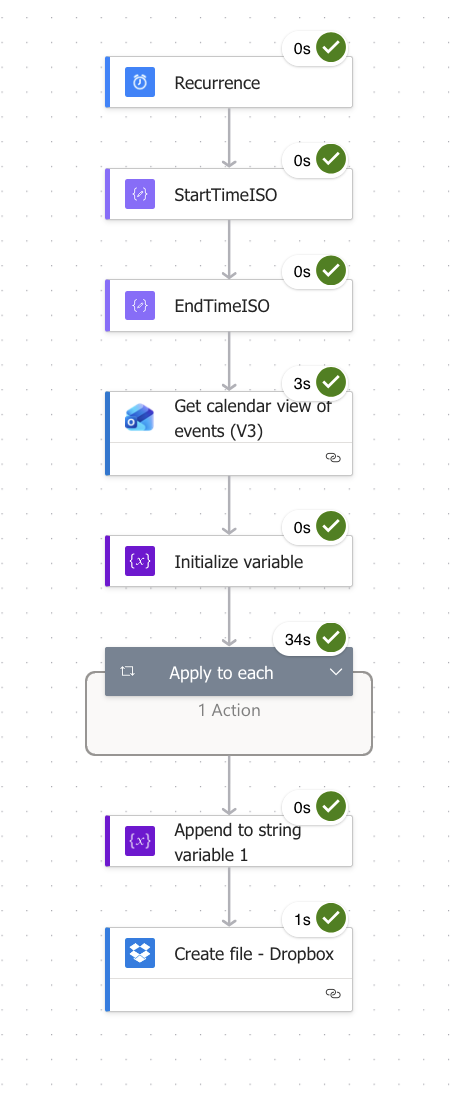
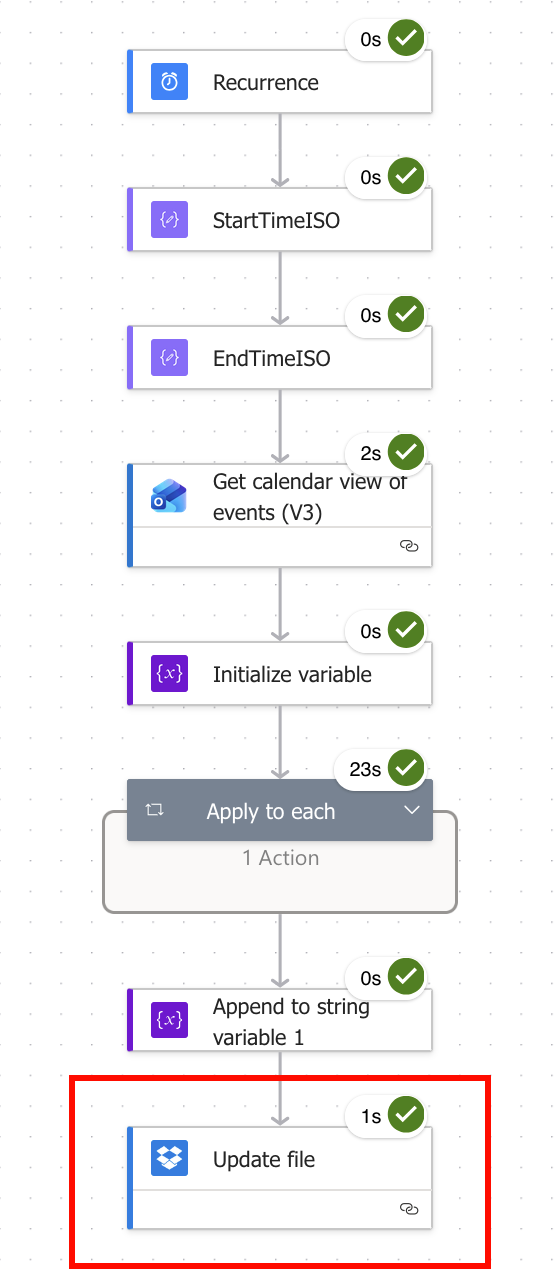
At this point, the working flow was essentially:
UPDATE: It looks like the overwrite function is inconsistent so I replaced the “Create File - Dropbox” action with an “Update File - Dropbox” action.
Recurrence
StartTimeISO
EndTimeISO
Get calendar view of events (V3)
Initialize variable icsBody
Apply to each event
Append VEVENT block to icsBody
Append END:VCALENDAR
Create file in Dropbox
UPDATED FLOW
Step 10: Create a Public Link From Dropbox
Once the file existed in Dropbox, the next goal was to make it available to Apple Calendar. Dropbox can create a share link for the file, but the normal share link is not the same thing as a direct calendar feed.
A typical Dropbox share link looks something like this:
[https://www.dropbox.com/scl/fi/...](https://www.dropbox.com/scl/fi/...)
If you paste that into Apple Calendar directly, it usually fails because Apple Calendar wants a direct file endpoint, not a browser-oriented sharing page.
To convert to a downloadable link:
1. Go to Dropbox
2. Right‑click file → Copy link
3. Convert: ...?dl=0 → ?dl=1

https://www.dropbox.com/s/xxxxx/blah-blah-blah.ics?dl=1
Step 11: Subscribe in Apple Calendar
On iPhone, I added the subscribed calendar through:
Settings
Calendar
Accounts
Add Account
Other
Add Subscribed Calendar
On Mac, the equivalent path is:
Calendar
File
New Calendar Subscription
In both cases, I pasted the Dropbox URL that we edited to make it downloadable and ICS-friendly.
As soon as I used the direct dropboxusercontent.com link, the subscription worked.
I later added the same calendar to my wife’s iPhone, and that worked too.
Deciding What Information to Expose
One of the most important design decisions was how much to reveal in the exported calendar.
I ultimately chose to include:
- Meeting title
- Start time
- End time
I deliberately excluded:
- Attendees
- Notes
- Descriptions
- Meeting links
- Other rich metadata
This struck the right balance for me. It gave enough detail to coordinate life, travel, and planning, while still keeping the published feed relatively minimal. If you wanted stricter privacy, you could replace the meeting titles with a generic label such as Busy - Work. In my case, I decided that exact titles were acceptable.
Confirm That the Flow Runs Entirely in the Cloud
Another important question I wanted to answer was whether this setup depended on any of my own machines.
It does not.
Power Automate runs the scheduled flow on Microsoft’s cloud infrastructure. That means:
- My laptop does not need to be on
- My desktop does not need to be logged in
- No local script or cron job is required
This was a major benefit because it made the whole solution feel truly hands-off.
Confirm That the Dropbox Connection Stays Logged In
I also wanted to understand whether the Dropbox connection would remain valid over time. When you connect Dropbox to Power Automate, it stores an authenticated connection using an OAuth token. In normal use, that connection persists and does not require you to sign in each time the flow runs.
The connection could break if you revoke it, change certain security settings, or if Dropbox invalidates the token. But under normal conditions, it should remain stable. If that connection ever fails, the flow run history would show the error and the connection can be re-established in Power Automate.
Lessons Learned
- The biggest challenge was finding a hosting solution that Apple Calendar would accept
- Direct file URLs matter more than the generation of the ICS itself
- Testing the flow twice revealed Dropbox overwrite behaviour
- The problem was not Power Automate, but file hosting and link formatting
- Time-zone handling matters in calendar design
Troubleshooting
Dropbox file not updating - Post Mortem UPDATE
- Run the flow twice to confirm behaviour
- In most cases, Dropbox will overwrite automatically
- The flow failed recently, and could not overwrite the existing Dropbox file; as a quick fix, I replaced the “Create File - Dropbox” action with a “Update File - Dropbox” action; at some point I might consider a more elegant logic flow but I assume there will always be an existing file after running test flows
Calendar shows SSL or connection error
- Likely cause is using the wrong Dropbox link format
- Fix by converting to a direct
dropboxusercontent.comURL
Flow fails with invalid Start Time or End Time
- Do not use expressions directly in the Outlook action
- Use Compose steps instead
Event formatting errors
- Use
startandendfields directly - Do not use
.dateTime
All-day events clutter Apple Calendar
- Replace them with timed noon events
Final Thoughts
What started as a small convenience became a robust and elegant solution.
I now have:
- A fully automated calendar pipeline
- No need to log into work account on personal devices
- A clean view of work schedule on Apple Calendar
- A shared view with my wife for planning
Most importantly, it runs quietly in the background and just works.
Summary
I used Power Automate to generate a read-only ICS file from my Outlook calendar, hosted it on Dropbox using a direct file URL, and subscribed to it in Apple Calendar. This created a clean, private, and fully automated bridge between my work and personal ecosystems.