Caveats and Shout-Outs
- Full Disclosure: I wrote this guide primarily for myself. I have a nasty habit of getting something to work, then completely forgetting how I got there. I figured this would be a good way to force myself to write some notes in the event I needed to replicate the homelab in the future.
- The basis of this post is heavily based on OxBEN’s excellent HomeLab HowTo, which uses VirtualBox. I wanted to replicate that awesome setup using VMware Workstation Pro. Please refer to that HowTo as a foundation - my notes summarize how some steps or concepts may differ if using VMware Workstation Pro. I’ve tried to repeat as little text or images as possible - but where I do, full credit goes to OxBEN’s work.
- Public Service Announcement: The first thing I do after creating a fresh Kali install, is run Dewalt’s pimpmykali script to optimize my VM. YMMV, but it significantly improves my quality of life with Kali.
Why Build a HomeLab
I am in the early stages of my InfoSec Journey, where it is more convenient to access practice boxes through online services like Hack The Box and Try Hack Me; however, full access (including retired boxes) requires a subscription.
I then experimented with virtualizing vulernable boxes, including The CyberMentor’s Active Directory Lab in his Practical Ethical Hacking course. Unfortunately, these boxes were visible on my home network, and some of my activities were detecting or were detectable by other machines.
To avoid any unintended consequences, I started to think about sequestering my activities to a subnet, and stumbled upon OxBEN’s setup.
In addition to protecting my home network from myself, other benefits with setting this up include:
- learning about networking;
- hands on experience with pfSense and firewall rules;
- have more control and ability to customize the test environment;
- isolate vulernable boxes from my home network and the internet;
- isolate my scans, scripts and exploits to the HomeLab;
- set up chained or pivoting scenarious which require multiple machines or subnets;
- if successful, this might help some other folks who want to try this;
- …and did I mention “protecting my home network from myself”?
Summary of the Network
The end result is to have 3 subnets with limited access to one another, the home network, and the internet.
High level features of each subnet include:
LAN aka 10.0.0.0/24
- where Kali lives
- Kali will have a static IP of 10.0.0.2
- in VMWare: VMnet2
ISOLATED aka 10.6.6.0/24
- where vulernable VMs live
- blocks access to verything except:
- DNS lookups
- Kali VM
- in VMWare: VMnet3
AD_LAB aka 10.80.80.0/24
- Blocks packets to host network
- Blocks packets to ISOLATED network
- Allows access to all other subnets
- Allows access to the internet
- Domain Controller has static IP of 10.80.80.2
- in VMWare: VMnet4
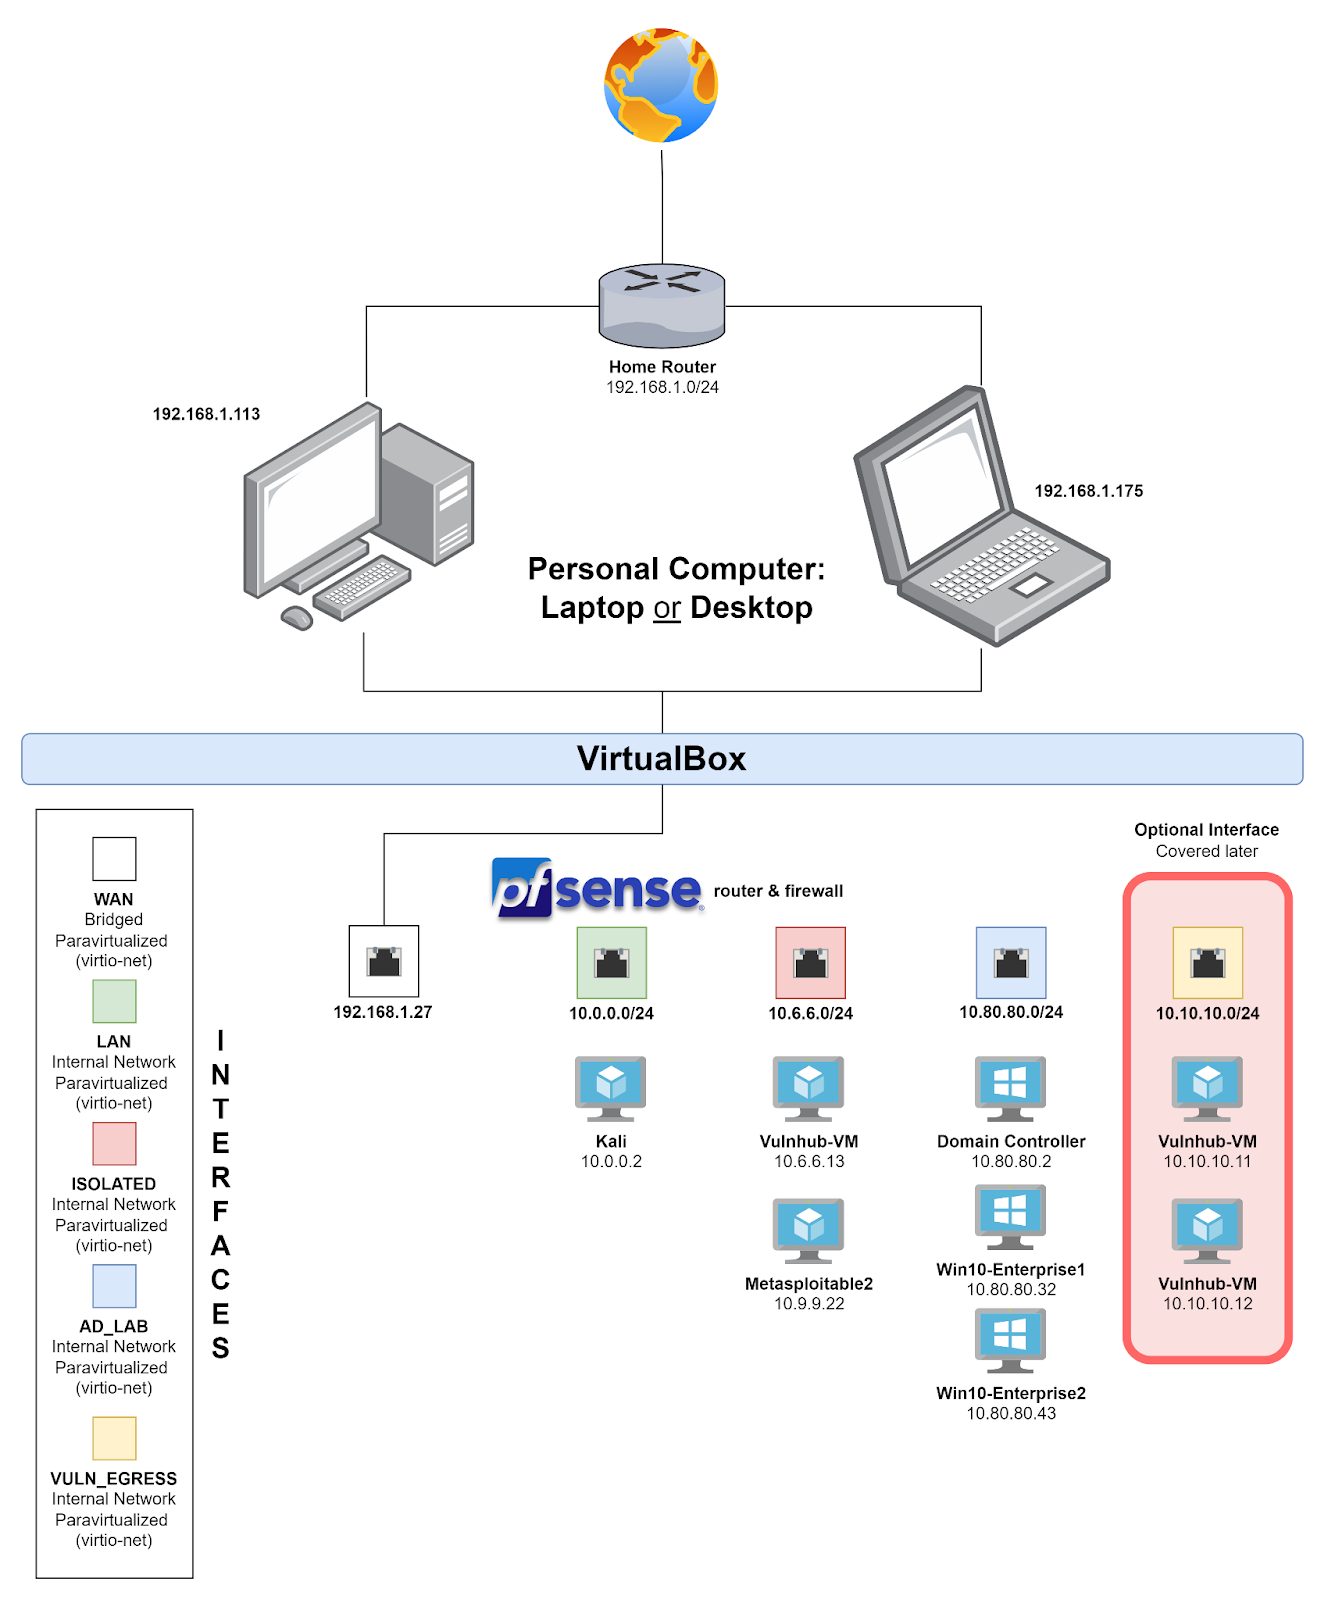 Figure by 0xBEN
Sections
I will follow 0xBEN’s structure, and break up the build process into the following steps:
- Installing VMware
- Installing pfSense
- Installing Kali
- Configuring Firewall Rules in pfSense
- Add Vulernable Virtual Machines
- Building the Active Directory (AD) Lab
- Troubleshooting
- Adding another interface to pfsense (I haven’t tried this yet)
HomeLab VMware Section
These posts can all be found in its own section:
Good luck and see you on the other side!
ip3c4c